
Imagine Being Able to Just Collect Exported CSV/TXT/Excel Files in One Folder,
Name them Properly/Consistently, and Magically Combine them Into a Single Smart Table
Intro from Rob
You know my old joke, that “Export to Excel” is the third-most-common button in data applications behind OK and Cancel? Well it’s not really a joke – the world RUNS on export to Excel, and in most cases, the export button actually produces a text file – a .CSV (Comma Separated Values) or .TXT (Text – typically tab-delimited).
Dealing with those exported files has been VERY labor-intensive in the past, but there’s great news: the newer tools from Microsoft are AMAZING at handling these exported files and making terrific sense of them – in an eyeblink.
Seriously, if you’re toiling away today, doing ANY of the following:

- Creating a new version of a spreadsheet EVERY time you export a CSV
- Struggling with data being treated as text in Excel when you need it to be a number
- Lacking any ability to trend/compare the exported data over time
- Just generally spending much more time getting the right data connected with the right analyses
…then you need to know that your life can be much better, TODAY, just by using the newest capabilities from Microsoft.
Gil is here to help. Take it away, sir…
Already Good, Just Got Better
The Power BI team has recently released an enhanced “combine binaries” experience as part of November 2016 update to Power BI Desktop. (Jargon Alert: “Combine Binaries” is a scary term. Instead it should be named “Magically combine multiple files together into one table and make me SUPER happy.”) The improved experience can drastically help you to import multiple Excel or other files from a folder and avoid writing advanced query functions. But today we will focus on a specific scenario, which is so common that it deserves this special post – Handling CSV files.
In fact, today’s blog post is actually the first post in “The CSV Series”. I hope you will enjoy it. To celebrate the November update of Power BI Desktop, we will review the improved experience, and will walk you through one of the most common scenarios that is now so easy to implement – Importing multiple CSV files from a folder, including parts of their filenames.
NOTE: for now this “enhanced” capability is only available in Power BI, but Microsoft has been pretty consistent about bringing these benefits to Excel. Stay tuned for my next post in this series, to learn how you can do it in Excel, who lacks the Power BI improvement (at least for the time being. Hopefully the improvement will find its way to Excel soon).
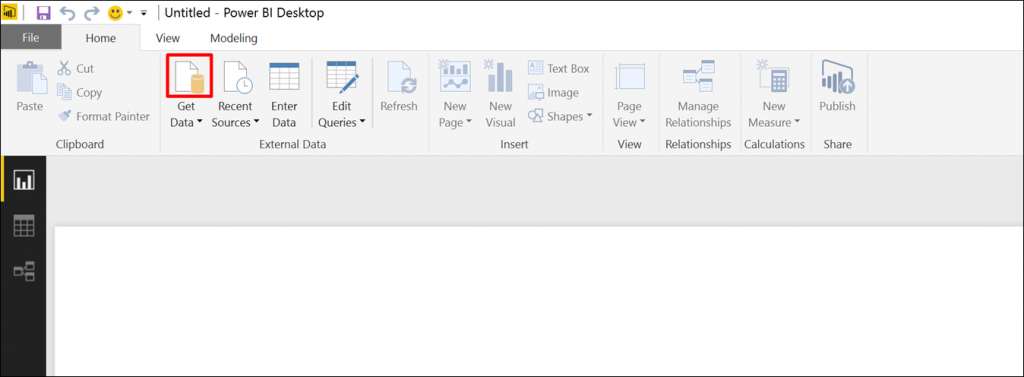
It all starts with a somewhat-hidden yet magical button – You can see it highlighted in the following screenshot:

The Button Looks Like an Elevator Going Down
(But Really It’s “Magically combine multiple files together into one table and make me SUPER Happy”)
Prior to November update, clicking the magical button (AKA combine binaries) was only effective when you had a folder of CSV files. All CSV files were appended into a single file. There were only two caveats:
1- It only worked on CSV files (If you had other file types, such as Excel workbooks, you had to create a query function to process a single file and then invoke the function on all files. This is now done automatically for you in the November update of Power BI).
2- If your CSV files contained crucial meta data in the filename, you “lost” that data after clicking the combine binaries button.
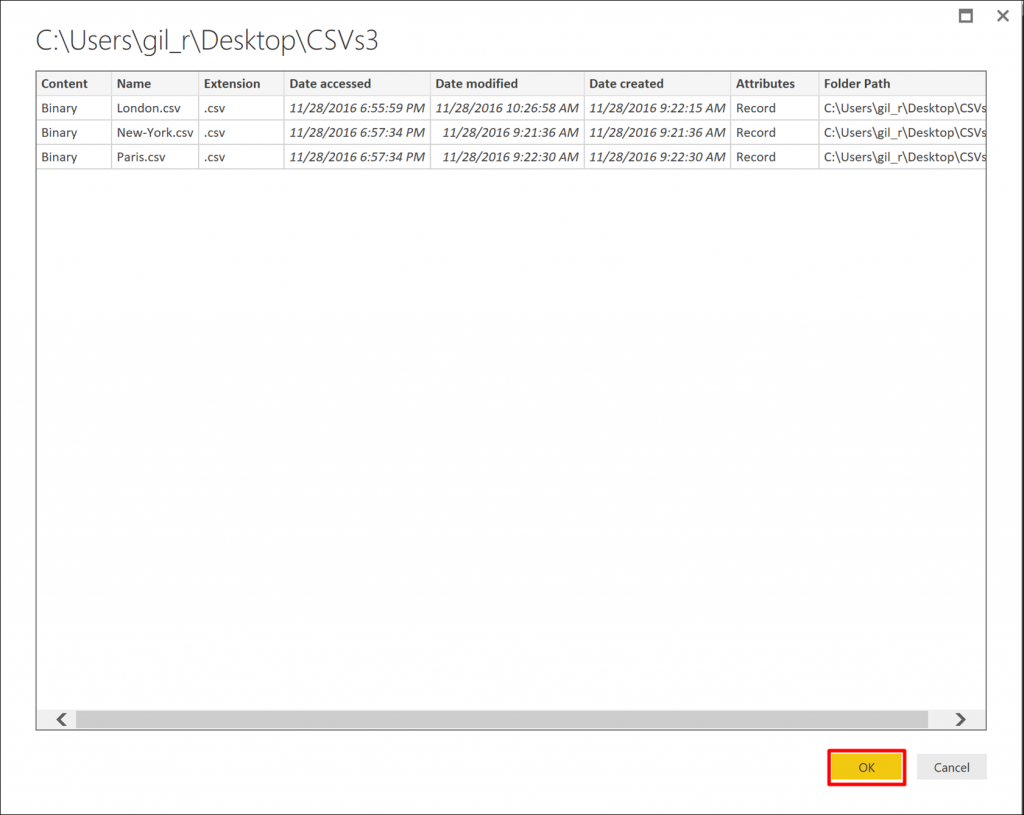
For example: In the screenshot above you can see that we have the cities information in column Name. Clicking the combine binaries will append our sales data from each city, but we will no longer be able to associate the data to the city, if the city is not mentioned in the CSV files. This limitation was so common, and for many users, who weren’t familiar with query functions or were reluctant to manipulate the Power Query formulas, this magical button had become useless.
So today, with the new functionality in Power BI Desktop, you can append all CSV files together and keep their filenames in the appended results. Let’s review the new experience on a folder of CSV files.
Open Power BI Desktop and click Get Data icon.
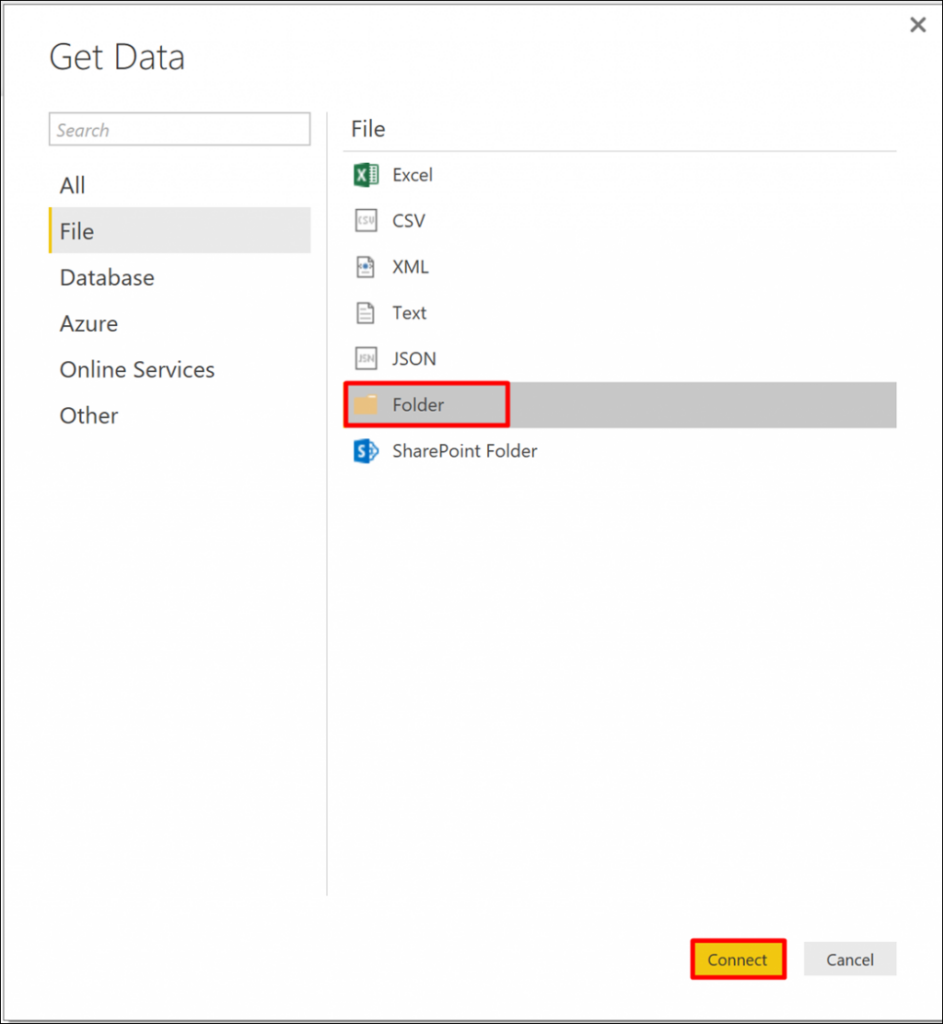
Select File and then select Folder and click Connect.
Click Browse to browse to a folder with CSV files. Select the relevant folder and click OK. Click OK again in the Folder dialog.

In an extra-probably-unnecessary step will will see the content of the selected folder. Click OK.
In the Query Editor you will notice the small icon in the header of the first column. This is our Combine Binaries button. Click on it, and the magic will happen.

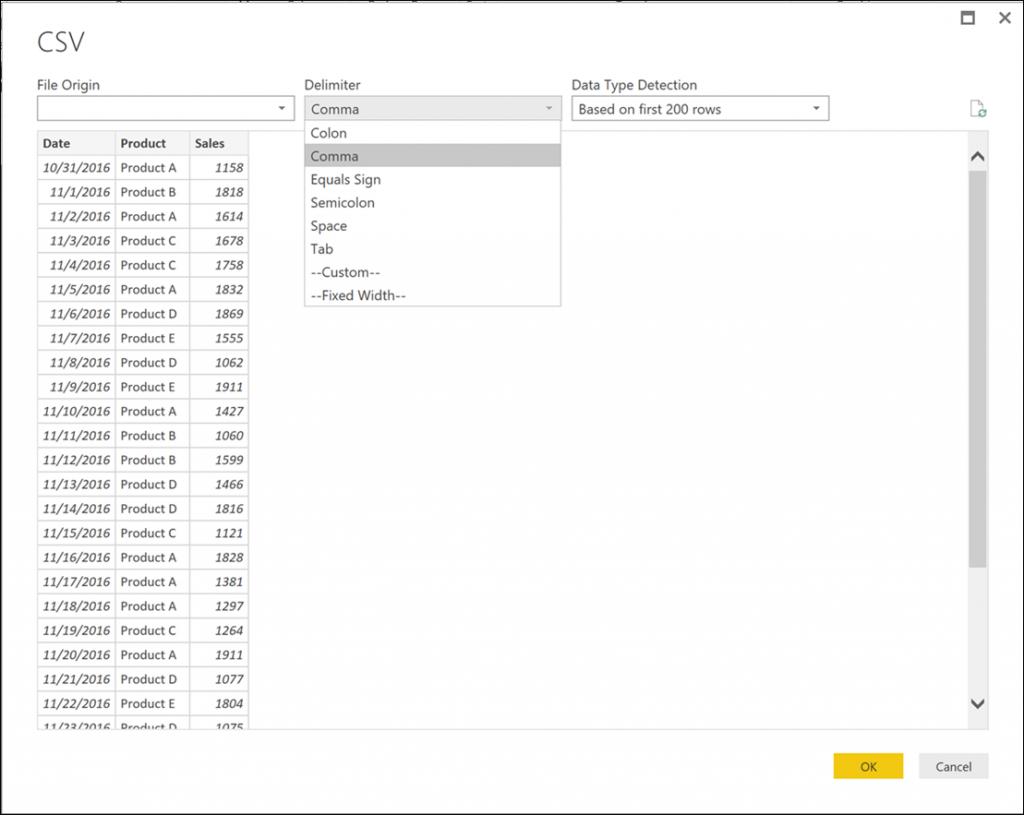
With this update of Power BI Desktop, a new step is introduced after you click the Combine Binaries. You will see a preview of the first file (For example, with Excel workbooks, you will get to see a navigator window that will allow you to choose which worksheet or table to load). For our CSV scenario, you will notice the CSV dialog.
In this dialog you will see a preview of the data from the first CSV file. Under the hoods, Power BI will automatic detect which delimiter to use, and may even promote the first row as headers. You can manually change the delimiter, or define how Power BI should handle data types. You can set it to automatically detect data types based on first 200 rows, or the entire dataset or you can even opt out the detection of data types.
The results are awesome – We can now import and combine all CSV files from a folder, and include their filename in the appended table.
You can see that the filename is now located in the new column Source.Name.
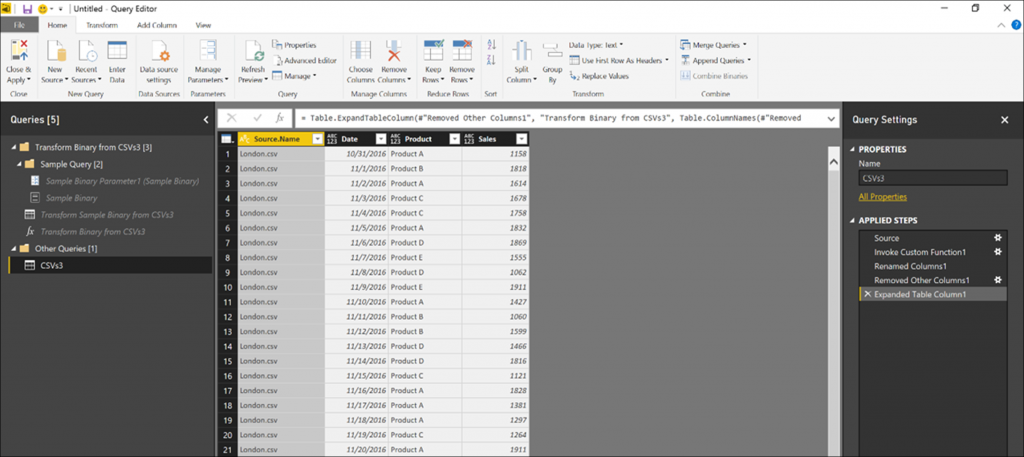
You may notice that Power BI Desktop creates new artifacts on the Queries pane. If you don’t consider yourself an advanced Power Query user, I suggest that you just ignore those new “strange creatures”. Imagine that that they don’t exist.
But if you insist on scrutinizing your Queries pane, follow my blog post here to learn more about these artifacts.
Turning File Names into Meaningful Columns!
Sometimes, your exported data does NOT tell you “where” it came from. For example, in our data here, each CSV was created by filtering some other application by city and then pressing Export – but the resulting report/export did NOT include the City as a column! When we saved the CSV, we re-named it “London.csv” etc. so that at least the filename “remembers” where we got it from. (Another common example is the same exact export run over different timeframes rather than different locations – one for January, one for February, etc. – in which case the technique below will also be 100% applicable).
So our next step is to extract the city from column Source.Name. It’s pretty simple.
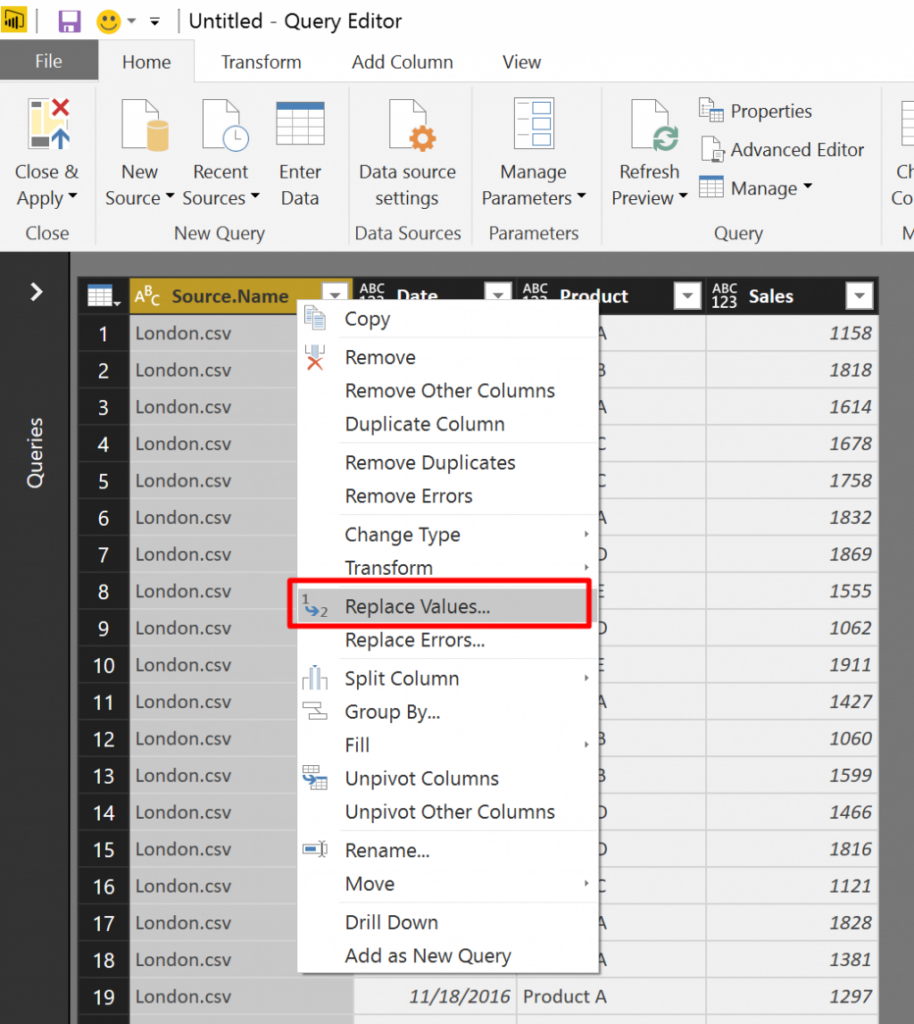
Select the column Source.Name, and right click on its header, then select Replace Values.
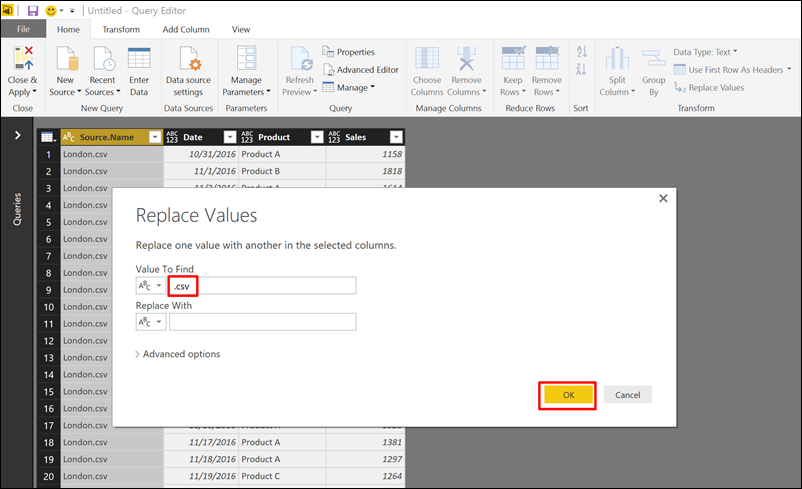
In the Replace Values dialog, set .csv as Value To Find, and click OK. This step will remove the extension (*.csv) from all the values in column Source.Name, leaving the cities intact.
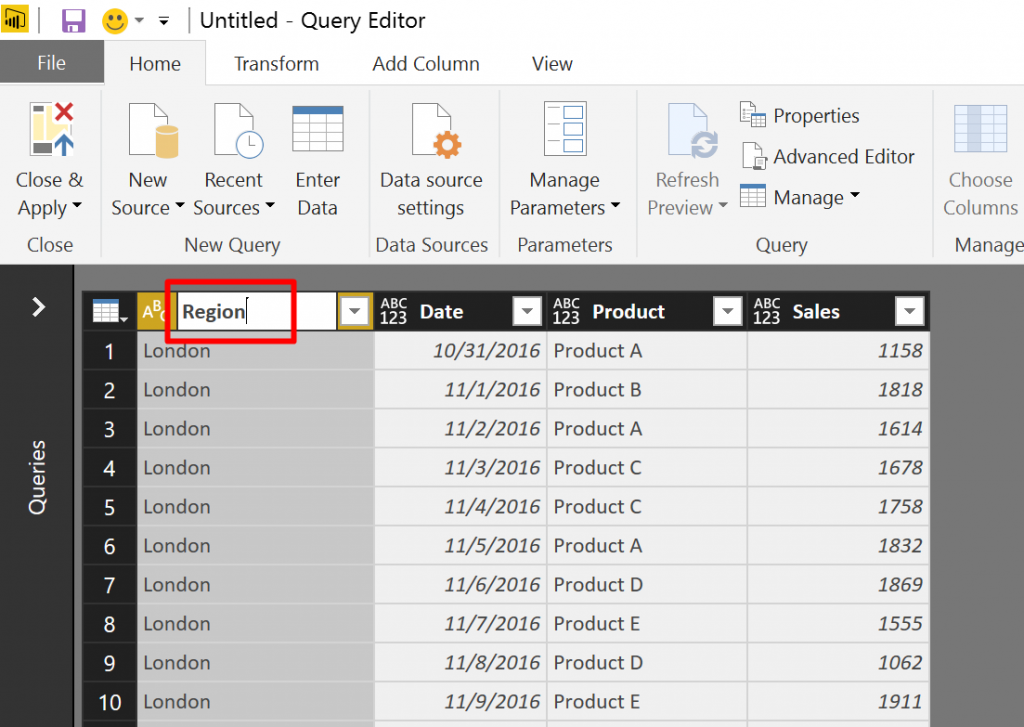
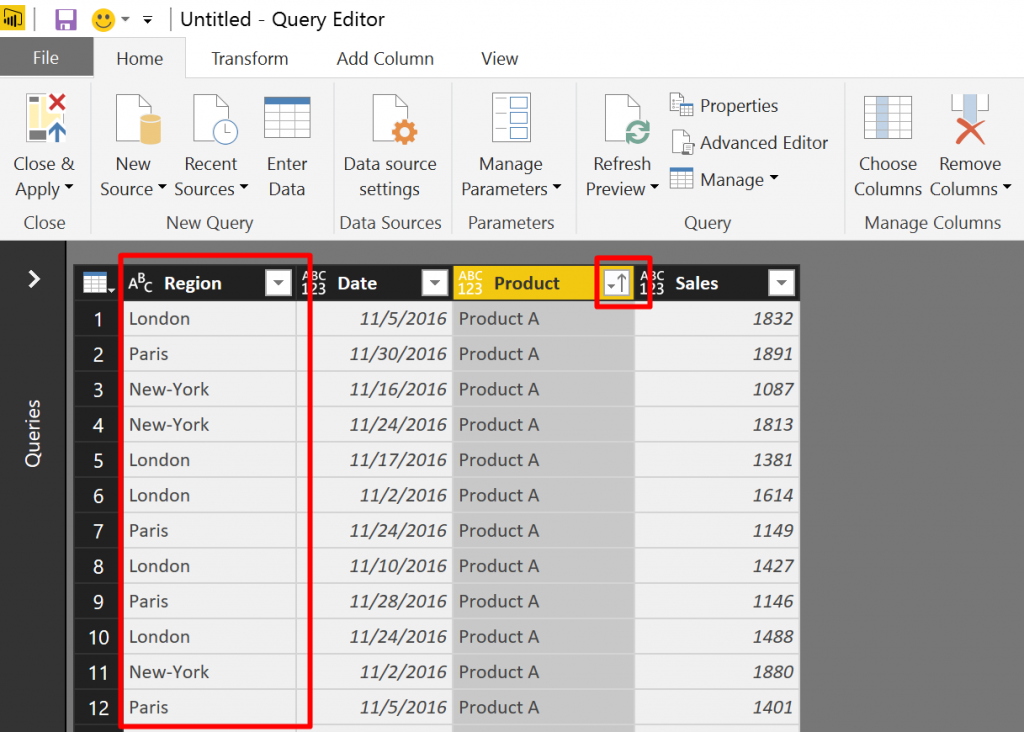
Now that we have extracted the cities from our filenames, we can rename the column to Region (Renaming is simple. Same way you rename a filename in a folder).
To prove that we were able to combine all the files, and have filenames as regions, let’s sort our data by Product. To sort the data by Product, click the sort button. It’s similar to sorting tables in Excel.
Do you see all the cities in column Region? Isn’t it awesome?
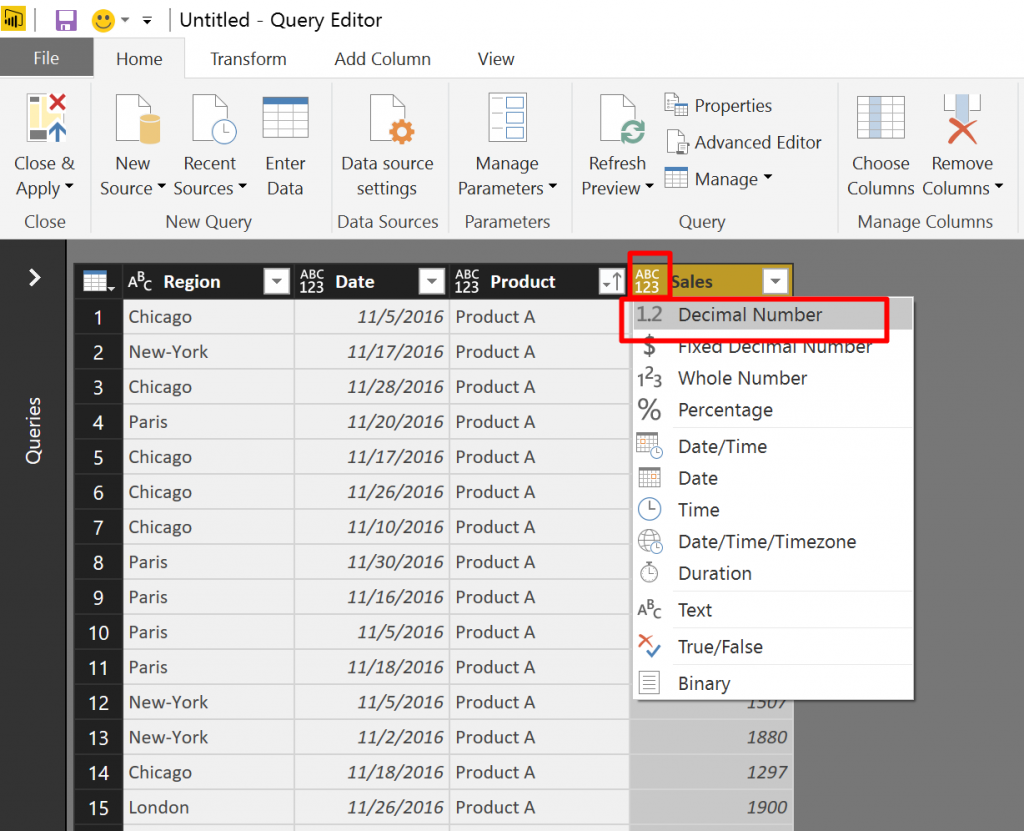
Before we close the Query Editor, it’s important to ensure that our numeric/date columns have the right data type. In our example, we can change column Sales to Decimal Number, and column Date to Date.
That’s it. Clicking Close & Apply in Home tab, will load all our CSV files and their filenames from the folder. Here is an example for a simple report that I’ve built.

Now, for the sake of completeness and awesomeness, let’s check out what happen to our report, if we add new data for Chicago region by adding a new CSV file Chicago.csv to our folder.
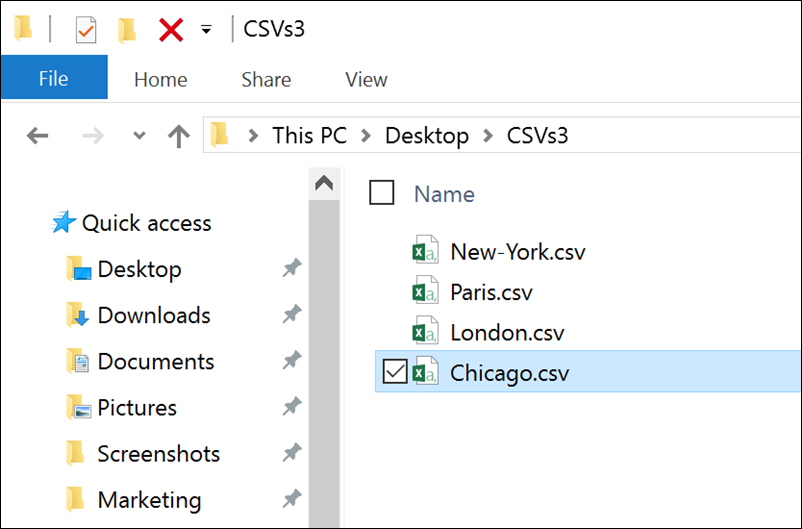
Clicking Refresh on the report will immediately append the data from the new CSV file along with the other CSV files in our folder, and include region Chicago in our report. And this is real magic.
Conclusions
Following this blog post, I hope you are encouraged to download the latest Power BI Desktop and import multiple CSV files from a folder. You can now easily include the CSV filenames to refine the appended table with supplementary information.
I hope that Microsoft will soon update Excel with this improved experience (they usually do).
Stay tuned for my next post in “The CSV Series”.
Get in touch with a P3 team member