Intro
Power Query (aka “Get and Transform” in Excel, aka the “Query Editor” in Power BI Desktop) is a powerful ETL tool, more powerful than you might expect from something native to Excel (also a native part of the free software Power BI Desktop).
The example in this article is a bit anachronistic (I did it this way because I was in a jam, but your first recourse should be to contact StatsCan directly to see if they offer a data product or service that suits your needs), but I like to use it as a demo because it shows off some of the web-scraping, data transformation, and parameterization capabilities of Power Query with some publicly available data. We’ll use the GUI and also dive into the M (Power Query’s “Mashup” formula language) code a bit.
The Issue
Data analysts are often tasked with answering the question of where an organization’s clients come from (“mapping” their clients). If you’re working with a decent CRM, you likely have access to clients’ addresses, postal codes or forward sortation area, and it’s easy enough to plot the count of clients onto a map.
But just showing how many clients come from different areas leaves certain questions unanswered, the most obvious being, “is the difference just due to differences in population across areas?” To address this, some demographic data is needed as a base. And if you have a specific clientele (a certain age range or gender for whom a service is appropriate), you’ll want to use a particular break-down of those population factors.
The Challenge
The data we will be working on is here: it includes the age and sex breakdown for every Forward Sortation Area (FSA, the first three letters of a postal code) in Canada.
There are a few problems using this in any kind of agile, automated way, though.
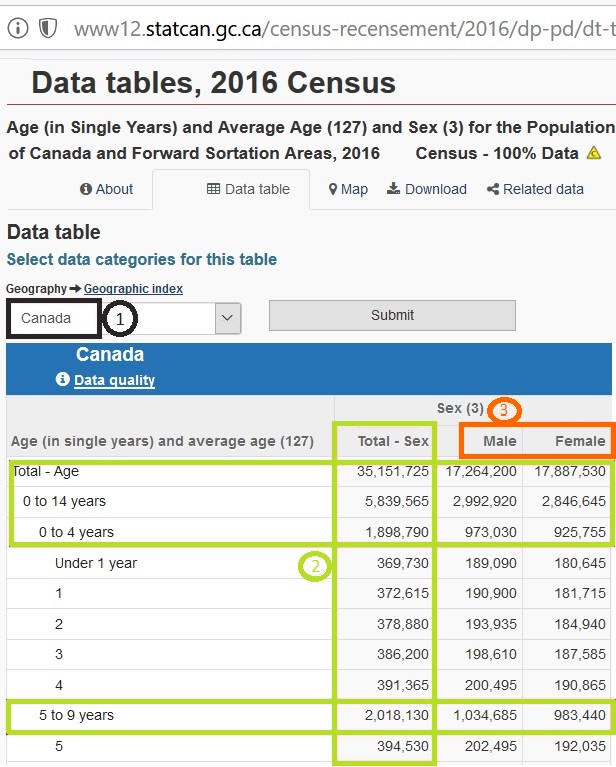
1) The most obvious is that the data is only available for one FSA at a time (you can choose FSA from the drop-down in the top left of the page. In the image above, all of Canada is chosen).
Second, the structure isn’t optimized to relate to other tables or to summarize in a pivot table:
2) There are summary rows for various levels of age groups, and a column that adds population for both sexes.
3) There is one column for each sex when there should be one column for the variable sex with rows for Male and Female.
So this is what we need to do:
First, transform the table so it’s in the structure we want. Second, apply this transformation to every FSA.
We’ll do this all with Power Query.
Part I. The Initial Transformation
How should the data be structured, ideally? There should be one text column for FSA, one text column for gender, one number column for age, and one number column for the population. Why? Any variable that you want to calculate, slice by, filter by, etc., must have its own column for you to do so appropriately using tools like cross-tabulations or a pivot table.
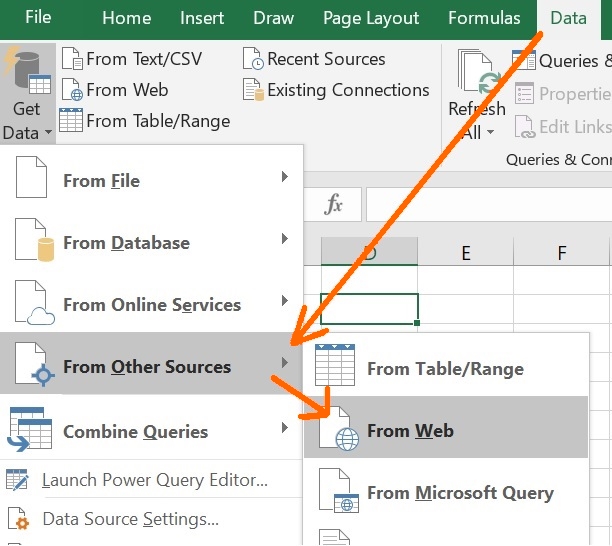
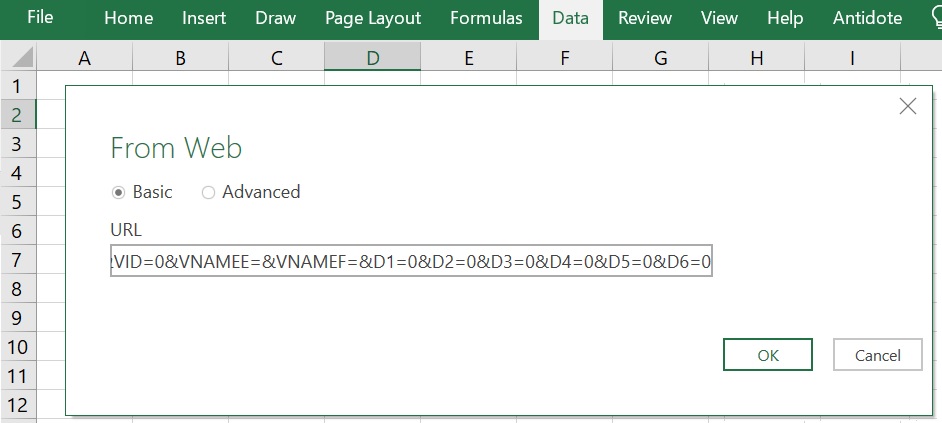
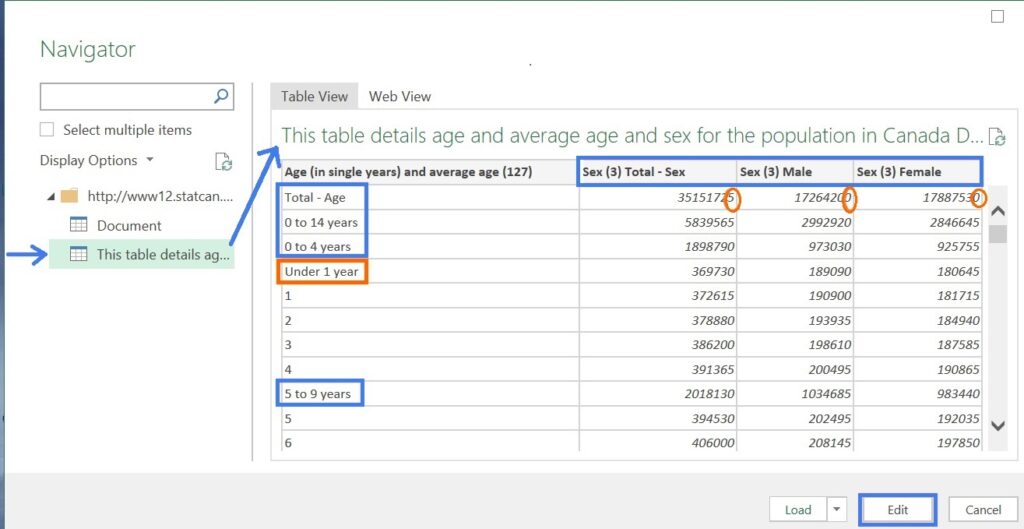
From here we can start restructuring the table to suit our needs better.
Age column: Eliminating summary rows
First, let’s rename the column to something shorter, like “Age (Single Years).”
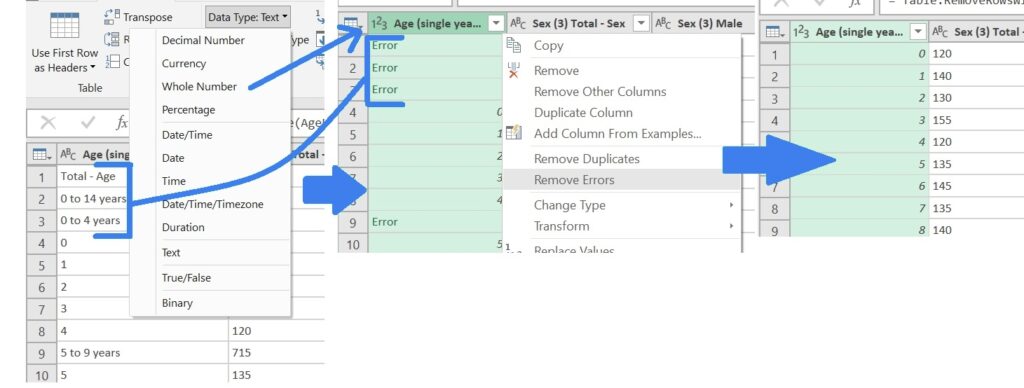
Next, let’s address the main problem with this column: in addition to the ages, there are summary rows for two levels of age buckets. There’s a simple one-two combo move you can perform in Power Query using just the GUI to remove summary rows that are text when the main rows are numbers:
- Format the column as number; all the rows that have text will show “Error.”
- Choose to “remove errors” from the column drop-down.
In this case, however, there’s a complication: kids less than one-year-old and adults 100+ only have text values describing their age, not a number. So before we do the old format-as-text-then-replace-errors, we have to fix this: We do two find-and-replaces:
- · “Under one year” with the number 0, and
- · “100 years and over” with the number 100.
(True, the latter isn’t ideal. But we might end up only using age buckets in our reports and formulas, anyway. Otherwise, we should be sure to mention the trade-off in a note in any reports for which we use this data).
Now we can use the old one-two, and it works like a charm.
Sex Columns: Unpivot to transform the headings into rows
Next, we tackle the table structure. We don’t need the column that adds up the male and female sex, so let’s remove it. Now, we apply one of the most useful functions in Power Query: Unpivot. This is like the “Variables to Cases” function in SPSS. It takes multiple column headers, and turns them into rows in a column, with the corresponding values in the other columns.
The figure below describes what happens when we unpivot:
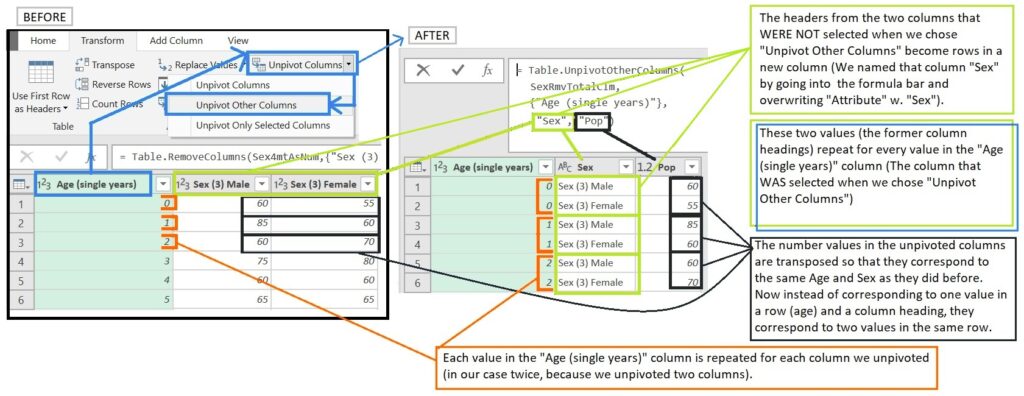
By default, the headers for the new columns say “Attribute” and “Value,” but I’d like them to be a bit more meaningful. We could just click in the column header and rename them, but I like to do it inside the M code in the formula bar, saving a step. Let’s overwrite “Attribute” with “Sex” and “Value” with “Pop” (for population).
All that’s left regarding transformation is to replace the “Sex (3)” text left over from the heading so that they only read “Male” and “Female” and to format all the columns as either text or numbers, as appropriate. Now we have the data just the way we want it, but only for one page of over 1000.
Pt. II Parameterizing the above Query and Iterating Across All FSAs
Now the tricky part: we’re going to take the transformations we just performed, turn them into a single function, and apply that function to every FSA in that dropdown list we mentioned at the beginning of the article.
To get a clue on how to do this, let’s break down the page URL as we navigate to different area codes.

We can see in the URL that the number after GID and the FSA after GC are what change as we choose different FSAs from the drop-down. Playing around with the URLs in the address bar reveals that just changing FSA doesn’t take us the corresponding FSA’s page. Only changing the value for GID changes the table.
Pt. IIb: Side Mission: Using Power Query to Scrape HTML Code
Let’s poke into the page source code. If we Ctrl+f to search for any FSA, like A0A the first and only thing we find, luckily, is a list of these GIDs right next to the FSA’s to which they correspond. We want to get this data into a two-column table with FSA in one column and the GID (which we’ll eventually call “FSACodeNum”) in the other.
This is one of the reasons I like this example. We’re not just using Power Query to transform the data so we can gain insights from it. We’re also using it to gain insights about the data itself. In this case, about how the website retrieves the data you ask for.

We could just cut and paste this block of text into an Excel sheet and do a few “text-to-columns” by a delimiter to get this into the structure we want, but let’s go Power Query all the way so we can show off some of its web scraping capabilities.

Let’s start a new query the same way as when we first connected to the web page but making one small change to the M code that’s generated: Delete “Web.Page(” and the end bracket that corresponds to the one we deleted (thanks to Ken Russell who wrote this article for that).

Now we see an icon that represents the contents of the web page. When we right-click it, we can see some of the options we have to open it. Previously, it had been opening as HTML (the “Web.Page” formula crossed out above), but now we want to open it as simple text. We select “Text,” and then convert the result into a table.
What Power Query shows us, now, is the text of the html code that makes up the page.
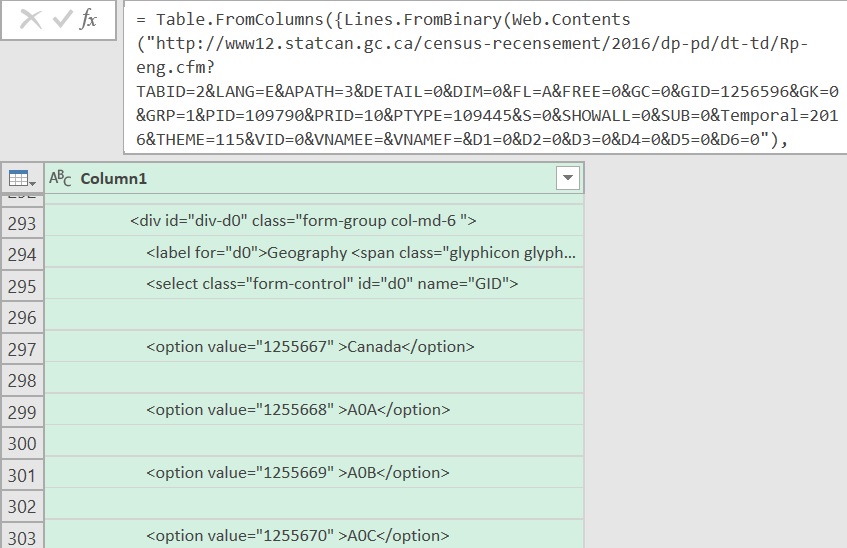
We have another bit of luck: every line in the block of code we want has some particular text that isn’t likely to show up anywhere else in the page code. Hence, it’s easy to filter the rows of text to only those that contain, for example “<option value=.”
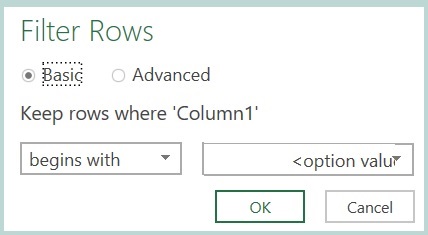

After a “split-columns-by-delimiter” and a couple of “Extract-Text-Before/After-Delimiter” we have the data set up exactly the way we want it (again, I changed the column names in the M code to save a step, from the default “Attribute” and “Value” to “FSACodeNum” and “FSA”).
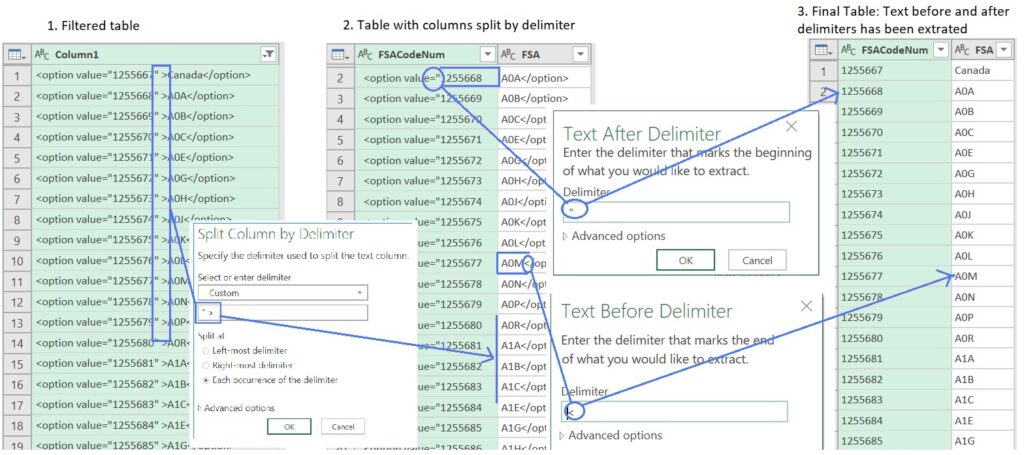
As I mentioned, we’ll name it “FSACodeNum.”
The text generated by the query:
let
    Source = Table.FromColumns({Lines.FromBinary(
                                Web.Contents(
"https://www12.statcan.gc.ca/census-recensement/2016/dp-pd/dt-td/Rp-eng.cfm?TABID=2&LANG=E&APATH=3&DETAIL=0&DIM=0&FL=A&FREE=0&GC=0&GID=1256596&GK=0&GRP=1&PID=109790&PRID=10&PTYPE=109445&S=0&SHOWALL=0&SUB=0&Temporal=2016&THEME=115&VID=0&VNAMEE=&VNAMEF=&D1=0&D2=0&D3=0&D4=0&D5=0&D6=0"), null, null, 65001)}),
    SelectFSARows = Table.SelectRows(Source, each Text.Contains([Column1], "<option value=""")),
    RmvCanadaRow = Table.SelectRows(SelectFSARows, each not Text.Contains([Column1], "Canada")),
    RplTxtqSelectedq = Table.ReplaceValue(RmvCanadaRow,"selected=""selected""","",Replacer.ReplaceText,{"Column1"}),
    SplitFSAfrmCodeNum = Table.SplitColumn(RplTxtqSelectedq, "Column1", Splitter.SplitTextByDelimiter(""" >", QuoteStyle.None), {"FSACodeNum", "FSA"}),
    XtrctFSACodeNum = Table.TransformColumns(SplitFSAfrmCodeNum, {{"FSACodeNum", each Text.AfterDelimiter(_, """"), type text}}),
    XtrctFSANum = Table.TransformColumns(XtrctFSACodeNum, {{"FSA", each Text.BeforeDelimiter(_, "<"), type text}}),
    Slct_KLM_FSAs = Table.SelectRows(XtrctFSANum, each Text.StartsWith([FSA], "K") or Text.StartsWith([FSA], "L") or Text.StartsWith([FSA], "M")),
    #"Renamed Columns" = Table.RenameColumns(Slct_KLM_FSAs,{{"FSACodeNum", "GID"}})
in
    #"Renamed Columns"
Pt. IIc: Back to Parameterizing the Transformation
You may be asking yourself, what is Parameterizing, anyway? Remember what we want: the population is broken down by Age and Sex like we ended up within the first section of this article, but for every single FSA, not just the one whose page we’re querying.
So we’re going to turn the transformation from the first part of this article into a formula, and make the FSA code the Parameter that we’re going to feed into that formula from the “FSACodeNum” table that we just made in Pt. IIb.
To do this, let’s make a copy of the transformation query and call it “fnCensusAgeSexTbl,” and look at the M code that was generated.

To turn a query into a function, all you have to do is type ()=> before the “let” statement at the beginning of the query.
To create a parameter within the function, we define that parameter within the brackets.
For some videos of how to do this, check out Matt Masson and Tessa Palmer’s Deep Dive into the Power Query Formula Language, and Paul Turley and Brian Grant’s Advanced Data Transformations.
In our case, we’re going to call our parameter “FSACodeNum.”
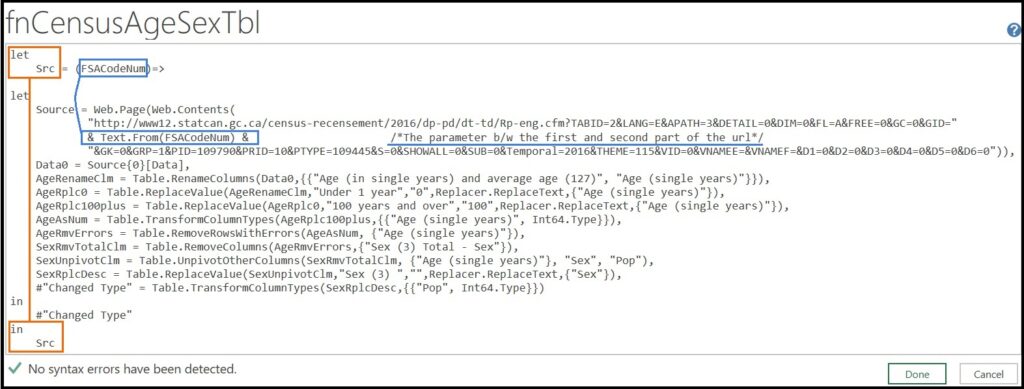
Now, we parse the URL in the M code: The URL is formatted as text and is encased in quotation marks.
We’re going to split it into the part of URL just before the GID and just after by putting a closing quotation mark after the equals sign that precedes the GID and an opening one after. Then we’re going to replace the GID with “&Text.From(FSACodeNum)&” (no additional quotation marks). The “&” signs concatenate the text that makes the first part of the URL, then the Parameter name, and then the second part of the URL. The “Text.From” formula in which we’ve wrapped the parameter “FSACodeNum” is to ensure that the number is read as text so that it can be concatenated into the URL string.
Here is the resulting M code:
let
    Src = (FSACodeNum)=>
let
    Source = Web.Page(Web.Contents(
"https://www12.statcan.gc.ca/census-recensement/2016/dp-pd/dt-td/Rp-eng.cfm?TABID=2&LANG=E&APATH=3&DETAIL=0&DIM=0&FL=A&FREE=0&GC=0&GID="
& Text.From(FSACodeNum) &
"&GK=0&GRP=1&PID=109790&PRID=10&PTYPE=109445&S=0&SHOWALL=0&SUB=0&Temporal=2016&THEME=115&VID=0&VNAMEE=&VNAMEF=&D1=0&D2=0&D3=0&D4=0&D5=0&D6=0")),
Data0 = Source{0}[Data],
    AgeRenameClm = Table.RenameColumns(Data0,{{"Age (in single years) and average age (127)", "Age (single years)"}}),
    AgeRplc0 = Table.ReplaceValue(AgeRenameClm,"Under 1 year","0",Replacer.ReplaceText,{"Age (single years)"}),
    AgeRplc100plus = Table.ReplaceValue(AgeRplc0,"100 years and over","100",Replacer.ReplaceText,{"Age (single years)"}),
    AgeAsNum = Table.TransformColumnTypes(AgeRplc100plus,{{"Age (single years)", Int64.Type}}),
    AgeRmvErrors = Table.RemoveRowsWithErrors(AgeAsNum, {"Age (single years)"}),
    Sex4mtAsNum = Table.TransformColumnTypes(AgeRmvErrors,{{"Sex (3) Total - Sex", Int64.Type}, {"Sex (3) Male", Int64.Type}, {"Sex (3) Female", Int64.Type}}),
    SexRmvTotalClm = Table.RemoveColumns(Sex4mtAsNum,{"Sex (3) Total - Sex"}),
    SexUnpivotClm = Table.UnpivotOtherColumns(SexRmvTotalClm, {"Age (single years)"}, "Sex", "Pop"),
    SexRplcDesc = Table.ReplaceValue(SexUnpivotClm,"Sex (3) ","",Replacer.ReplaceText,{"Sex"}),
    #"Changed Type" = Table.TransformColumnTypes(SexRplcDesc,{{"Pop", Int64.Type}})
in
    #"Changed Type"
in
    Src
When we save the changes to the M code we see that this query doesn’t look like the others. We don’t see a table when we click on it; we get a prompt asking us to enter data. Enter any of the GID numbers from one of the URLs, and it creates a new table for the FSA represented by that GID.
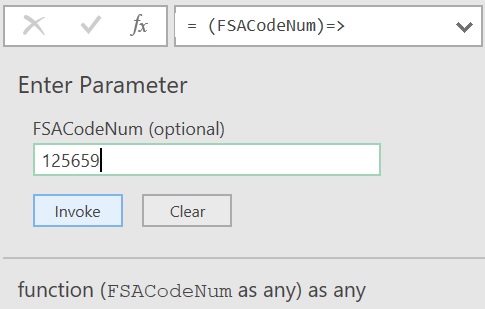
We’re not going to create a table for over 1000 FSAs by doing this over 1000 times, though. Rather, we’ll apply this function across all the rows of the FSAxGID table we made in the previous section of the article (IIb.).
We do this by adding a custom column in that table. In the prompt we type in fnCensusAgeSexTbl (the name of the function we created) and in brackets the name of the column, in square brackets, with the number we want to plug in as our parameter, in our case it’s [FSACodeNum].

Now we wait… I’m not sure if it’s because of internet connectivity (we are downloading around 1,620 web pages, here), or lack of RAM/processing speed, but it takes a while for the data to load to the table. But when it does, we have all the population by age and sex table for every single FSA in Canada. We can load this to the Power Pivot Model and use a DAX formula to weight the number of actual clients based on age, sex and FSA that we set out in a slicer or formula (maybe more on this in another article).
Issues and Questions
You may have noticed that you have the option to download the entire table as a CSV for all years, and this might make your life easier. There are two reasons I didn’t use the file. The first is that the point of the article was more to show off Power Query’s web-scraping and iterating abilities. But also, this option isn’t available for the 2011 data, which is what was available when I first attempted this (and which I might be combining with the 2016 census data for a future article).
That brings up another question: what do you do if you want data between Census years? I was toying with the idea of appending tables for multiple Census years and using the MICE package in R to fill in the gaps for the non-census years (but in Power BI instead of Excel, since R script only works in Power Query for Power BI, not for Excel). (If anyone has any thoughts on whether that’s a good idea, suggestions for an alternate R package that’s meant more for linear/time series data, let me know.)
Also, I mentioned context and meaning in the early sections of this article. For most people, an FSA only really has those things if you’re looking at it on a map, but what if you’re looking at just a table or chart? You would want to see something like neighborhood names. You can, I think, buy FSA x Neighborhood Name data from Canada Post. But with Power Query and a little elbow grease, we can get the data from this Wikipedia Page, transform it (like we did with the one in this article but a bit more complicated), and apply that transformation with all the letters of the alphabet. That’s for another article.
Out of Scope: Remember they’re population “estimates.”
There’s one issue we won’t address in this article: every cell in these StatsCan tables is rounded to the nearest whole number that ends in 0 or 5. This means that the Male and Female columns don’t add up exactly to the numbers in the Total – Sex column and the individual age rows don’t add up exactly to the summary rows. Add to this that any “other” responses to the Sex question are rolled into the Sex – Total column, and we end up with a number for our total Canadian population estimate that is somewhat lower than StatsCan’s. If we really wanted to, we could set things up so that we get more exact numbers, but for my purposes (putting numbers from neighbourhoods in context, showing off some of Power Query’s utility), and considering the small difference (half of one percent of the total Canadian population) not worth getting into here.
Summary and Next Steps
We wanted a dataset we could use to put client and service data into context. To achieve this, we used Power Query in the following ways:
Part I. The Initial Transformation
- We used the “From Web” option in “Get Data” (Support | Formula1| Formula2) to connect to a website containing a StatsCan table with age and sex data for a single FSA ( an FSA that could be changed by choosing a different one from a drop-down on the web page).
- We used the
- We converted the steps in that transformation into a Parameterized Function (Support | Dev) that we could apply to a list of all FSAs
Part II. Creating a Function and Web Scraping
- We created the index for that list of FSAs and codes used to navigate to them by scraping the webpage using:
- The Lines.FromBinary and Web.Contents functions to get the code from the web page into Power Query
- The Select Rows (Support | Formula) option to select the rows with the FSA’s and their corresponding codes
- Transformed those into a table with two columns using
- We added a custom column (Support | Formula) to this table with the Function we created in Pt. I as the column generator variable. We passed the column with all the GIDs (the code that identifies the FSA’s in the StatsCan URL) as the parameter for the function, and expanded the resulting column (Support | Formula) so that we would have the StatsCan age and sex data for all FSA’s, structured the way we need it, in this one table.
Where to go from here? One thing I’d like to do is add some context to the FSA’s by linking them with corresponding neighborhood names. I’ll use this set of Wikipedia pages to create a table I can merge with the one we just created.
And let’s not forget the reason we’re doing this in the first place: to connect it with some client/services data so we can create a measure like “Clients Served/100,000” that we can filter by age, sex and area (and search by neighborhood). To do this, we’ll use Power Pivot and DAX.
See you then.
Microsoft’s platform is the world’s most fluid & powerful data toolset. Get the most out of it.
No one knows the Power BI ecosystem better than the folks who started the whole thing – us.
Let us guide your organization through the change required to become a data-oriented culture while squeezing every last drop* of value out of your Microsoft platform investment.
* – we reserve the right to substitute Olympic-sized swimming pools of value in place of “drops” at our discretion.
Get in touch with a P3 team member