
In 2013, Rob showed how to use a disconnected table and slicer to show moving averages with a variable time period. That post built on an earlier post, which steps through the process of creating moving averages.
What-If-Parameters, teased at MDIS in June 2017, have just been released to Power BI. This is a great new way to get disconnected tables into Power BI. But, it should also help more people than ever discover the joy of disconnected tables. With the latest update of Power BI, you can now CLICK A BUTTON to create new what-if-parameters. As a result, the button creates a series of numbers in a disconnected table and a harvester measure to get the selected value. As an added bonus, you can even add the slicer to the page at the same time.
So, could we use the what-if-parameters to get the same results? Let’s try it. To begin with, we’ll need a Sales and Calendar table and a DAX measure for Units Sold.
Step 1: Create a new What-if-Parameter

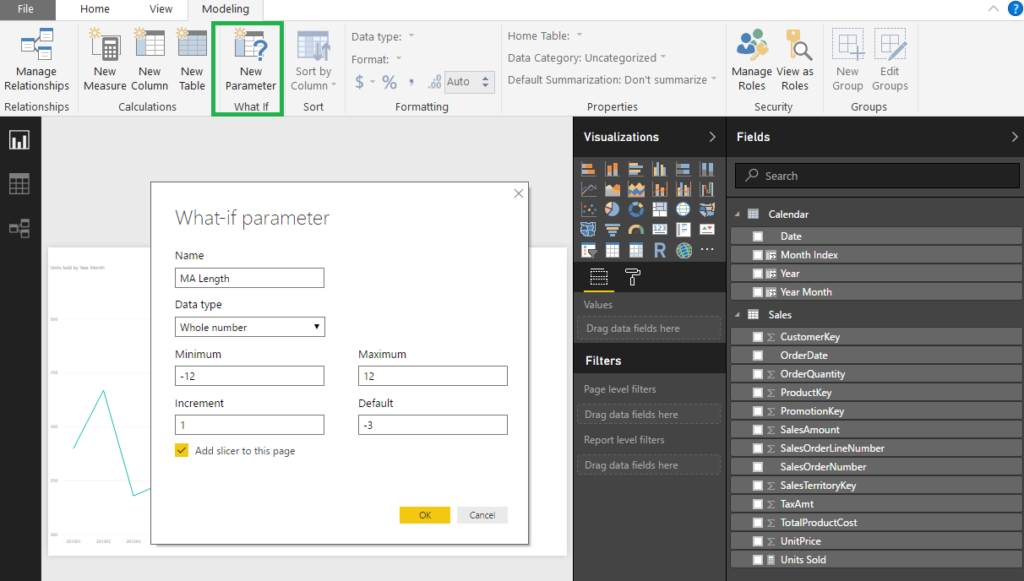
From the Modeling tab, click the New Parameter button to bring up the window. This window creates a table and a DAX harvester measure. You can also add a slicer to the page. Values for Minimum, Maximum, and Increment are required. As a great touch, there’s an optional AlternateResult. This default value is in effect if no slicers are active, or if the user clicks more than one slicer.
= SELECTEDVALUE (Table[ColumnName, [AlternateResult] )
In a recent post, Matt Allington points out that this function is the same as:
=IF(HASONEVALUE(Table[Column]), VALUES(Table[Column]), <alternate result>)
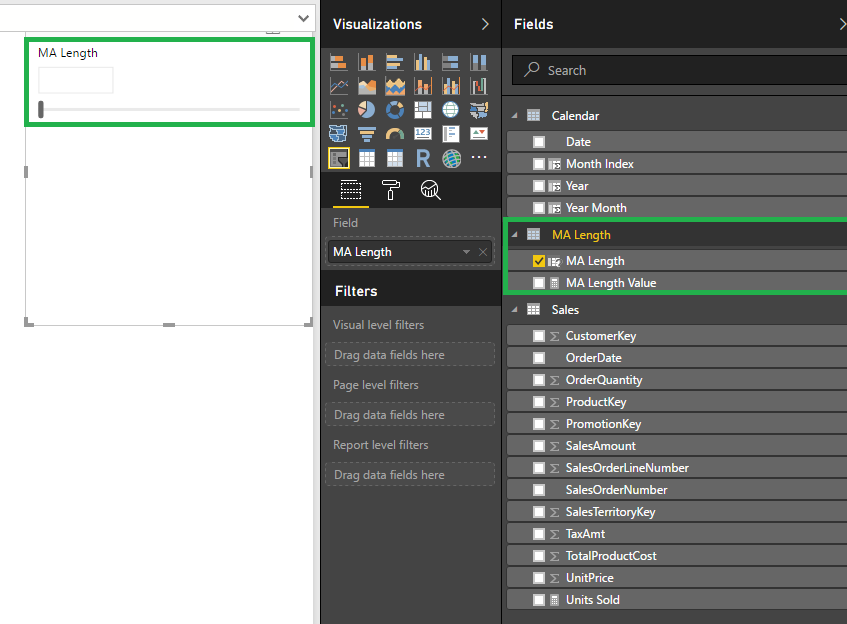
Step 2: View your new disconnected table and slicer

The new table now displays in the fields area. Before, we had to make these tables in Power Query, or with the Enter Data button in Power BI. But no more! Now, the What-if button creates a table for us using DAX. No query or pasting required. By the way, this new tool is only available in Power BI. Neither the What-If-Parameter nor the DAX functions behind it are yet available in Excel.
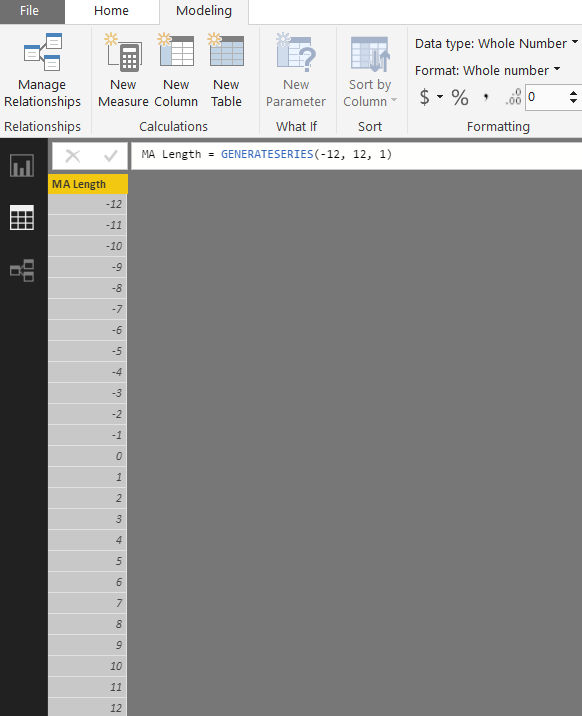
The What-If-Parameter button created this table

Note the new GENERATESERIES() function! This is how the table looks in Data view. There’s a table formula at the top and the results on the rows of the table.
[MA Length] = GENERATESERIES(-12, 12, 1).
This formula plugs in the values from the window: start of -12, end of 12, and move up by 1. Increment can be any positive number like 2, 5, or .05.
GENERATESERIES ( StartValue, EndValue, [IncrementValue] )
The formulas below are from Rob’s original post. I made a couple of changes. Firstly, I replaced the original harvester measure.
[Variable Moving Sum] =
VAR CurrentDate =
IF (
[MA Length Value] > 0,
FIRSTDATE ( ‘Calendar'[Date] ),
LASTDATE ( ‘Calendar'[Date] )
)
RETURN
CALCULATE([Units Sold],
DATESINPERIOD(Calendar[Date],
CurrentDate,
[MA Length Value],Month
)
)
[Variable Moving Average] =
[Variable Moving Sum] /
CALCULATE( DISTINCTCOUNT(Calendar[Year Month]),
DATESINPERIOD(Calendar[Date],
LASTDATE(Calendar[Date]),
[MA Length Value], Month
)
)
Secondly, I set the first argument for DATESINPERIOD based on whether the range is forward or back. The original post advised this step to fix the time range for forward averaging.
Here’s the syntax for DATESINPERIOD():
DATESINPERIOD(<dates>,<start_date>,<number_of_intervals>,<interval>)
How do we get the right number of months going forward?
DATESINPERIOD casts ahead or back x months, starting with the start date parameter. Going back, there’s no problem because it starts with the last date of the current month, and therefore includes the full current month. Going forward, the measure should begin with the first date of the current month in order to include the full month. Instead, if the last date is used for forward averaging, the period will include one day from the current month. And this makes the count of months one more than it should be! For example, with three months forward, the measure would divide by four instead of three. So, the formula for [Variable Moving Sum] here corrects this issue. Since our variable switches between FIRSTDATE() and LASTDATE(), this gives us the right count of months.
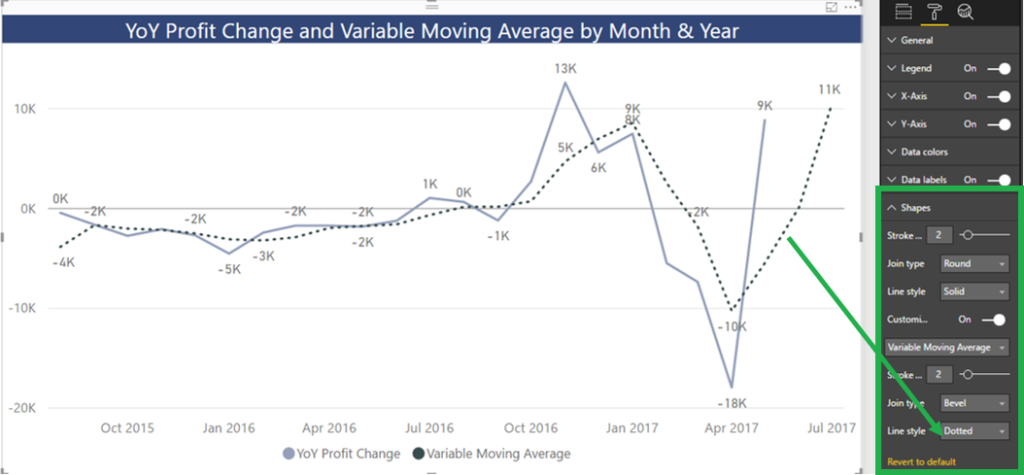
After creating these measures, we can put [Variable Moving Average] on the chart. Then, we can apply color to the sales and moving average lines. In addition, we also have new formatting options: markers and line style.
Step 3: Create & format your moving average chart

The AlternateValue of the harvester measure is -3. Thus, the moving average displays at three months back, even without a slicer selection. All great stuff!
Personally, I love these new What-if-parameters. And I especially love GENERATESERIES(). However, with fine tuning, we can go beyond what what’s possible out of the box. So stay tuned later this year for some cool stuff in Part 2!
Thanks to Reid Havens, for designing the moving averages dashboard. Download it below!
Get Your Files
Get in touch with a P3 team member