I’ll get to parameters for dataflows in a bit. To begin, let’s talk about dataflows. Dataflows are Power Query queries that live outside of Power BI reports and can be refreshed on a schedule within Power BI service. They are available for Pro and Premium users. Adam Saxton (from Guy in a Cube) has a great intro video for dataflows. Dataflows are a great way to get data transformations out of the report and into a form that can be reused by many reports. It’s that core P3 Adaptive value: write once, use many times.
Dataflow structure: a dataflow is a set of entities. The entities are the actual queries. They are also the results of the queries stored as csv files in Azure blob storage. There’s more, but that’s enough for today.
Dataflows [aren’t] limited by workspace
At this time dataflows are restricted by workspace, so I find myself writing once, and then copy pasting to multiple workspaces. If you have premium, you can use linked entities. Linked entities, by the way, are queries that refer to another query. Vote to get linked entities enabled for Pro users.
[Edit] Matt Allington (https://exceleratorbi.com.au/) kindly reminded me that dataflows aren’t limited by workspace. You can publish to any workspace and they will refresh.
Why is this a big deal?
Above all, continuous delivery. I want to make sure my reports are stable and reliable. This is a key value in agile governance. So, I follow option 2 of Planning a Power BI Enterprise Deployment (Word doc) by Melissa Coates and Chris Webb. I wrote an article on LinkedIn on the topic: Continuous Delivery in Power BI: If Salesforce can do it, can we do it with our Power BI reports? (Bonus: Breakfast Club reference within). And here’s my full process for working with two workspaces. Secondly, I have similar reports with row level security (RLS) for some users and without RLS for others. I prefer to have comments turned off for the RLS users and on for the unrestricted users, and there are still some functions not supported in RLS. I am glad to see that Q&A was enabled for RLS in December!
So, how can parameters help with dataflows?
When moving a report from beta to production, or from one workspace to another, it’s great to have a single point of change. The less you have to change, the better. Less chance of error and disruption. The goal is to give the report creator a parameter in Power BI desktop to simply choose the human readable name of the target workspace for the report.
[Edit] Here’s the Dataflows query
// Dataflows
let
Source = PowerBI.Dataflows(null),
#”Removed Other Columns” = Table.SelectColumns(Source,{“workspaceId”, “Data”, “workspaceName”}),
#”Expanded Data” = Table.ExpandTableColumn(#”Removed Other Columns”, “Data”, {“dataflowId”, “dataflowName”}, {“dataflowId”, “dataflowName”}),
#”Reordered Columns” = Table.ReorderColumns(#”Expanded Data”,{“workspaceName”, “workspaceId”, “dataflowName”, “dataflowId”}),
#”Pivoted Column” = Table.Pivot(#”Reordered Columns”, List.Distinct(#”Reordered Columns”[dataflowName]), “dataflowName”, “dataflowId”)
in
#”Pivoted Column”
This query writes some M code: DataflowSettings
let
    Source = Dataflows,
    Headers = "= #table ( { """ & Text.Combine(Table.ColumnNames(Source),""" , """) & """ } , { ",
    #"Start Values" = Table.CombineColumns(Source,Table.ColumnNames(Source), Combiner.CombineTextByDelimiter(""" , """, QuoteStyle.None),"Columns"),
    #"Added Prefix" = Table.TransformColumns(#"Start Values", {{"Columns", each " { """ & _ & """ } ", type text}}),
    Values = Text.Combine(#"Added Prefix"[Columns], ", ") & " } ) ",
    #"M Code" = #"Headers" & #"Values"
in
    #"M Code"
The query above is for Power BI Desktop. It scrapes the IDs for the workspaces and dataflows and puts them into a table. Well, actually, it puts them into M code for a table that we can copy paste into a new report template. Below is a #table() statement generated by this query as well as what the table query generates in the query editor. The code below won’t work for you because the IDs are specific to another workspace (and have been jumbled up a bit, as well!).
= #table ( { "workspaceName" , "workspaceId" , "My Lookup Dataflows" , "My Transaction Dataflows" } , { { "RLS Workspace" , "7f0bj4b7-j7j5-4445-bb0a-7j35e21f40ce" , "de83f417-34c5-41c4-834a-a0j24b00bf0b" , "adcd8f31-020b-4dj8-fef0-d02747ba0328" } , { "RLS Workspace - BETA" , "05jeebad-jfbd-4337-a7c1-2b1bb5a8b73c" , "b3753eaf-5b7e-4f5b-f7f8-341jc401cef7" , "a7cd71dc-052j-4bj7-f0b3-de0e2c1c2d70" } , { "NO RLS Workspace" , "d2403574-3dj2-4103-bj85-ca12aj0dcj21" , "25d70fa4-5e73-4705-ace4-cbf2jf3f7f7a" , "42e44001-a5fb-4b51-8eb2-7j7bf0ee7f2f" } , { "NO RLS Workspace - BETA" , "cc3beba0-1ca5-4e51-8f2b-71c40b118c12" , "ejc1cca3-jf2a-4jej-f243-cbb37ad7ecj7" , "8b111bej-b1c8-42f0-a34j-f37ejd3d7cj7" } } ) 
Creating a Power BI template file
Here’s how to put together a template file, step by step. I put each element below the list with a number.
- Open a new Power BI Desktop file
- Open query editor create a new blank query by pasting in the table code generated by your file into the advanced editor. Name the query DataflowSettings.
- In the same paste the Workspace List code above and name it Workspace List.
- In the same way, paste the function code and name it fGetId.
- Paste in the root query.
- (5a) Set all queries to not load to the report.
- Create a new parameter for the file itself (I’ll put this and the other steps below).
- Save as a template file (pbit).
- Open the template
- (M)agic
DataflowSettings (Step 2)
let
    Source = Dataflows,
    Headers = "= #table ( { """ & Text.Combine(Table.ColumnNames(Source),""" , """) & """ } , { ",
    #"Start Values" = Table.CombineColumns(Source,Table.ColumnNames(Source), Combiner.CombineTextByDelimiter(""" , """, QuoteStyle.None),"Columns"),
    #"Added Prefix" = Table.TransformColumns(#"Start Values", {{"Columns", each " { """ & _ & """ } ", type text}}),
    Values = Text.Combine(#"Added Prefix"[Columns], ", ") & " } ) ",
    #"M Code" = #"Headers" & #"Values"
in
    #"M Code"
Workspace name query: Workspace List (Step 3)
This is a simple query to put the workspace names into a list, which will be used by the parameter selector. Name it Workspace List.
let
    Source = DataflowSettings,
    Workspace1 = Source[workspaceName]
in
    Workspace1
A custom function to get id by names: fGetId() (Step 4)
This function takes a column name and a workspace name and returns the relevant id.
let
    Source = (pColumn as text, pWorkspace as text) => let
    Source = #"DataflowSettings",
    #"Filtered Rows" = Table.SelectRows(Source, each [workspaceName] = pWorkspace),
    #"Removed Other Columns" = Table.SelectColumns(#"Filtered Rows",{pColumn}){0},
    #"Converted to Table" = Record.ToTable(#"Removed Other Columns"),
    #"Changed Type" = Table.TransformColumnTypes(#"Converted to Table",{{"Value", type text}}),
    Value = #"Changed Type"{0}[Value]
in
    Value
in
    Source
A root query (Step 5)
This query will get the data from the dataflow. The second step, called #”*” is a spacer step that keeps the query editor from hiding what it’s doing. The step called Workspace sets the workspace id, and the step called Dataflow gets the dataflow id. I prefer these names to the default, which is the ID itself. The result will be a table of entities (similar to a list of tables in a database) that you can select from.
let
    Source = PowerBI.Dataflows(null),
    #"*" = Source,
    Workspace = #"*"{[workspaceId=fGetId("workspaceId",pWorkspace)]}[Data],
    Dataflow = Workspace{[dataflowId=fGetId("Data Warehouse Lookups", pWorkspace)]}[Data]
in
    Dataflow
Create the workspace parameter: pWorkspace (Step 6)
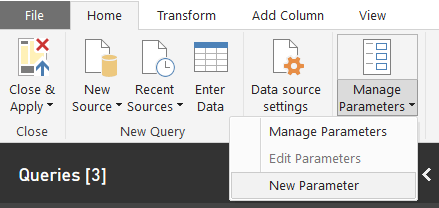
In the query editor, add a new parameter.

Then, edit the parameter.

The parameter needs a name. I called mine pWorkspace. I set it as required of type text. Suggested values comes from a query: the Workspace List from Step 3. Finally, add the name of a workspace. You have to remember the name and type it in at this point.
Save as a template file (Step 7)
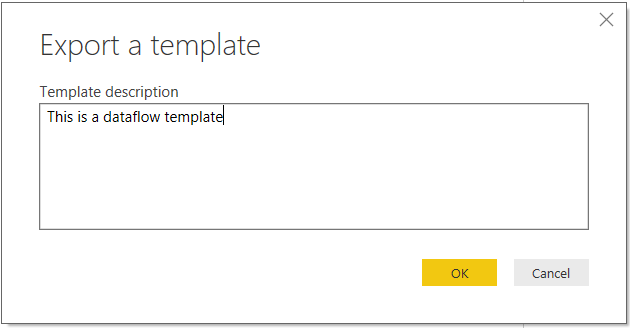
Save your Power BI Desktop file as a template.


Open the template file (Step 8)

Pick a workspace from the dropdown list. Then edit queries and reference to make a new query and select a table from the entities. If you have multiple dataflows in each workspace, you can save your template with one query for each dataflow.
(M)agic (Step 9)
Once you build out your report, you can change the queries to another workspace. As long as you have the same queries there, the report will work in that workspace as well.
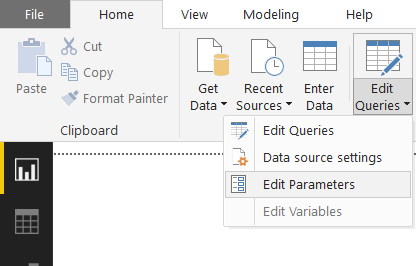
The easiest way to change the parameters is from in the report itself. In the Home ribbon, select Edit Queries: Edit Parameters.

And there you have it: easy as 1, 2, 3 … 9. What do you think? Is this worth your time or is it just too much work?
Disclaimers: Dataflows are in preview, so this could all break at any point. Also, Microsoft could also make it easier to reach the same goals. Opinions are my own. Do not taunt Super Happy Fun Ball.
Forget bending spoons with your mind – there’s no money in it.
It takes a special kind of mindset to “bend” data (and software!) to the human will. As this article demonstrates, we at P3 Adaptive can twist Power BI into a pretzel if that’s what an organization needs. (A robust, trustworthy, industrial-strength pretzel of course).
The data-oriented challenges facing your business require BOTH a nimble toolset like Power BI AND a nimble mindset to go with it. And as Val Kilmer / Doc Holladay once said, we’re your huckleberry.
Get in touch with a P3 team member