Happy New Year 2019 to our P3 Adaptive readers!
For the new year, I have a question for you: What do you think of when you hear the word “Flow”?
For me, I immediately think of “Flo” from Progressive – someone deserves kudos for their marketing skills! And if you’ve been a regular reader of P3 Adaptive Blog Posts, specifically my Blog Posts, you’ll know that I love any opportunity to include a cat meme.
Now, I had thought about making a new year’s resolution in 2019 to discontinue the use of cat memes… but this one was too purrfect!

So obviously, I’m not going to write a Blog Post about insurance, therefore, Flow must have something to do with the Microsoft suite of tools! Yes, that’s right… first there was PowerPivot In Excel, then came Power Query, Power BI Desktop and Power BI Service… and yes, there’s still more! It’s now collectively being called the Power Platform!
Let’s do a quick google search to find out… What is Microsoft Flow?

Sweet! I love to create and automate solutions! Let’s get started and kick off 2019 with…
… A beginner’s guide to Microsoft Flow
1.) Sign Up/Login to Flow
First, you can sign up for free with an O365 email address <OR> you can log in to Microsoft Flow by using the following link:
https://us.flow.microsoft.com/en-us/

You can also get to Microsoft Flow from your O365 screen.
![clip_image002[7] Flow - Office 365](https://p3adaptive.com/wp-content/uploads/2024/04/clip_image0027.png)
NOTE: You may need to select “Explore all of your apps” and then search for “Flow.” Then add the Flow App, and the Flow App Icon will appear in your list of Apps, just like in the image above from my P3 Adaptive O365 Account.
2.) Flow Parts: Name, Trigger, and Action(s)
Every Flow has a unique Name and two main parts: the Trigger, and one or more Actions.
The Trigger is used to invoke, call or launch the Flow when a specific App event occurs.
For example –
- Trigger a Flow from the Outlook App, when an upcoming event is about to start
- Trigger a Flow from the SharePoint App, when an item is created
- Trigger a Flow from the PowerApps App, when a button in the application is selected
The Action(s) are the step(s) executed once the Flow App Trigger event occurs.
For example –
- Action in the Notifications App, to send a mobile notification
- Action in the Outlook App, to send an email
- Action in the SQL App, to run a query (currently for SQL Server on Azure not SQL Server on-premise)
3.) Creating a new Flow from blank <OR> from template
Once you’ve selected the Flow App and have logged in, you can create a new Flow from scratch using the blank option <OR> from an existing template.
In the image below, you’ll see I’ve selected “My Flows” from the left-hand navigation pane and then under the “+ New“ menu there’s a drop down with (2) options: Create from blank or Create from template.

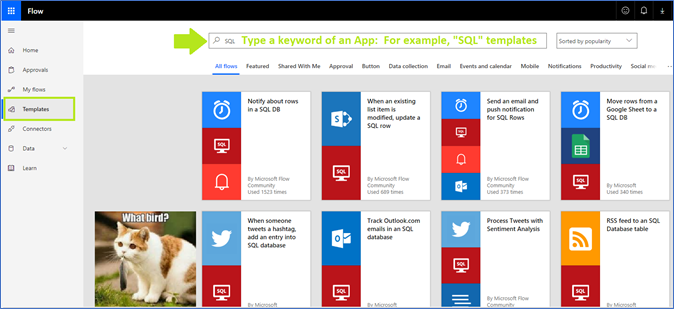
The My Flows > + New > Create from template option is going to provide you with all Trigger plus Actions(s) template combinations, which is useful if a template exists for the Flow solution that you want to create! Use the search option to filter all available Flow templates by Apps included in the Flow template.
In the image below, you’ll see that I’ve used the search to filter the Flow templates to show only the Flow templates that include the SQL Server App.

NOTE: Normally, I like to use a template to get started but it seemed the templates I selected required other Apps that I wasn’t already signed up for, i.e.,> Twitter. (I don’t Tweet – but I do NOW have a Twitter account… thanks to the Flow templates, ugh!). You will need to have an account with Apps used in your Flow(s) and you’ll need to log in to those Apps with your username and password.
4.) My Flows > + New > Create from blank

To create the new Flow, select My Flows > + New > Create from blank. The next screen will let you name your Flow and search for a Trigger App and event. Use the search to enter the name of the App to search for <OR> you can select the App if it’s already displaying.

This begins the workspace used to construct your new Flow!
5.) Choose a Trigger
For our example, select the “Outlook.com” App and you’ll get a list of the available Outlook.com App Triggers. Let’s choose the “When an upcoming event is starting soon” as our Trigger.

NOTE: You may need to log into Outlook if you are not already signed in.
Then enter the Calendar Id (required) using the drop-down options available, this is the name of the Outlook Calendar that you want to use. And then enter the Look-Ahead Time, here I entered 15 minutes, which means to look for an upcoming event in the next 15 minutes from the current time.

This is the Trigger part of our Flow!
6.) Add a new step
This allows us to build the Action(s) part of our Flow!

7.) Choose an Action
For our example, let’s select the “Notifications” App and the “Send me a mobile notification” Action.
Then enter the Text, Link, and Link label values.
For our example, I entered the Text value as “Event Starting in 15 Minutes” + the dynamic Subject of the Outlook.com event. And I entered the Link value as the dynamic Id for the Outlook.com event.

This is the Action part of the Flow.
NOTE: When building your Flows, each Application has different dynamic content that is available to you. For example, we can select add dynamic content to see the list of objects available to us from Outlook.com – and choose to include the Attendees Name, Start time, Subject, etc. The Expression options allow you to create more advanced dynamic content!

8.) Name & Save the Flow
Give your flow a name! Names are important – be mindful and create a naming convention strategy for your Flows I’m using a naming convention strategy that is a hybrid of the Trigger and Action: “Outlook Event Mobile Reminder.”
Outlook Event is the Trigger and Mobile Reminder is the Action.

There are two places where you can save your Flow – you can use the Save button at the bottom of the Flow steps <OR> the Save button in the upper right-hand corner.
9.) Test
Use the Test button in the upper right-hand corner – to run an on-demand test of your Flow!

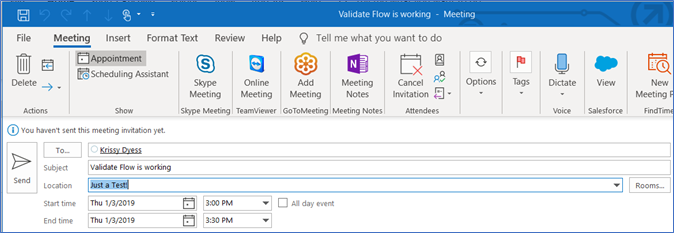
You’ll need to create a new event in Outlook to check that your Flow is working as expected!

Once the new event is created and saved, the Flow will run, and you should receive a reminder on your mobile device alerting you that you have an upcoming event about to start!

10.) View, Edit and Delete
Finally, if you go back to My Flows from the main Flow screen, you see your newly created Flow!
Here you can select your Flow and select from the dot, dot, dot menu items AKA “more” menu – you’ll see options that allow you to Edit, Share, Run History, Turn Off/On, Delete, etc.

So, what are you waiting for? Just go with the Flow!
… And why not, let’s see if PUG memes can be just as fun as CAT memes in 2019!

Here’s to a great 2019!
Additional Microsoft Resources for Microsoft Flow –
Website:
https://flow.microsoft.com/en-us/
Guided Learning:
https://docs.microsoft.com/en-us/learn/modules/get-started-with-flow/1-introduction
Documentation:
https://flow.microsoft.com/en-us/documentation/getting-started/
Community:
https://aka.ms/flow-community
Suggest Ideas:
https://aka.ms/msflow-ideas
Get in touch with a P3 team member