
How Far Down The Rabbit Hole Will You Go?
Welcome back P3 Adaptive Nation! By now we’re in full swing with this Power Query (M)agic series, three posts and counting! You’re now knowledgeable enough about Power Query (if you read Part One and Part Two, anyway) that I want to throw some cool techniques at you involving M code. The time has come to take off the metaphorical training wheels, dive into the deep end, leave the nest, take a leap of faith (boy does this guy love idioms…), because frankly you are READY FOR IT. “I know it, you know it, everyone knows it.”

“Take the blue pill, the story ends…take the red pill, you stay in Wonderland, and I show you how deep the (PQ) rabbit hole goes.” If you’re still reading, then you took the red pill and chose…wisely. Today I’ll be showing you how to add custom M code using the Advanced Editor. The Advanced Editor is where I LIVE and BREATHE when using Power Query, so welcome to my universe.
Specifically, I’ll be demonstrating two important ways to visually organize your query by renaming your applied steps and adding visual dividers between them. This technique is especially useful when you have a lot of applied steps, and want to add visual cues between related applied steps.
Since you’ve read the previous post in this series about folders, you’ve seen that visual aids can be VERY HELPFUL when building queries! These techniques are by no means necessary, but they can be a tremendous help in organizing your model. Anything that makes it easier to step back into a model months after development is a win in my book.
RENAMING STEPS > TAKING NOTES!
So I’ll be the first to tell you that, despite my best efforts, I HATE taking notes. It takes time and energy I chose not to give, especially when I need to store them separately in OneNote or a Word document. A beautiful feature of Power Query is the ability to rename any applied step to whatever you desire, essentially allowing you to write a single line of notes for each step! Corner cutters of the world unite!
This saves so much time, and it’s done easily enough by right-clicking on ANY step, selecting Rename, then changing the original title to whatever friendly name you want. My two cents: rename it to something that will make sense to anyone coming back to this model months (or years!) down the road.
Simply right click on the step you want change, the select rename from the drop down list:
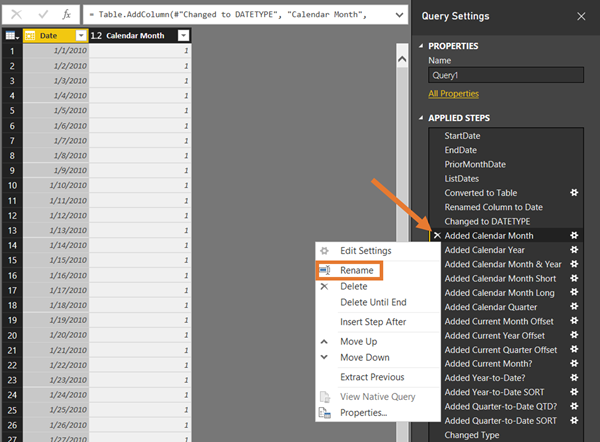
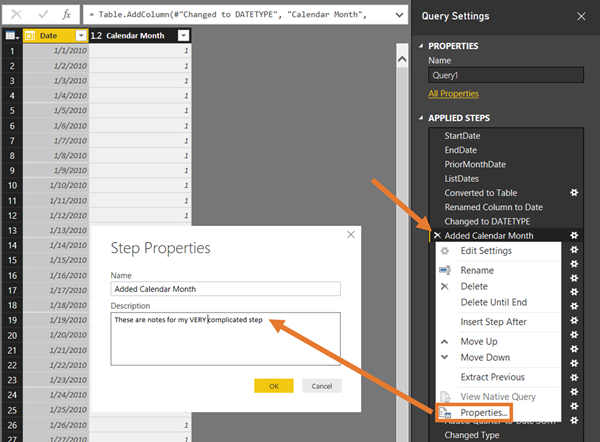
But wait, there’s more…you can also add notes to each individual step! You can do this in the SAME dropdown menu as above. What’s even cooler is that those notes…well they show up as a tooltip when you over. So in essence you can create high level summary notes by renaming the step. Then for steps that more complicated (think Rube Goldberg complicated), you can add additional tooltip notes. Badass, that’s what that is. Honestly I didn’t know this existed for the LONGEST TIME! I never would have guessed additional notes would be buried in the properties menu.
Just right click on the step you want to add notes too, select properties, then add your notes:
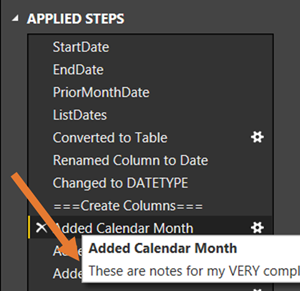
Hovering over your step now results in tooltips displaying:
The Way I Used To Do It (Old & Busted)
A comment on this post enlightened me to a better way to do this! So thanks to Milan Grahovac for the new hotness! I’ve decided to keep the old method in this post, because it does give a good intro to the Advanced Editor. Plus I’m sure some people will appreciate two ways to do something. With that said, let’s walk through the old method first.
Dividers can help you look like a Power Query Ninja if anyone ever digs into your models. Have any of you EVER looked at a workbook (or code) that was organized or had added comments, and NOT thought it looked professional? Take a minute to ponder that…you’ll realize that it almost ALWAYS left a better impression than one that didn’t.
I’m sure many of you are wondering “What the heck does this technique look like?!” Let’s seen an example! I create a calendar table in many of the models I build. Building it requires a lot of steps, and many of which are related and can easily be grouped together. Below is a before and after screenshot of the steps from that query, before and after adding Dividers between applied steps.
Giant hand man (let’s call him Steve from now on) is back to pass judgement on my organizational skills:
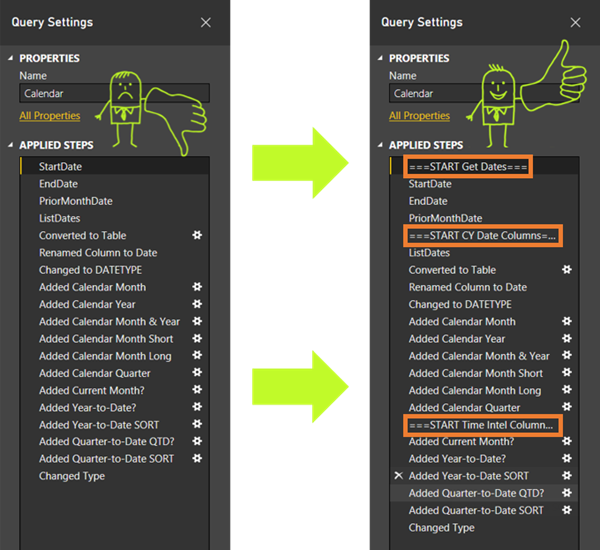
A keen observer (sarcasm much?) will notice extra lines I’ve added on right image, visually grouping sections of my applied steps. Adding these is easily accomplished by adding a few lines into the Advanced Editor window. It’s really easy to add them, but can be tricky to remove later.
But First…Some M Code Basics
Before I demo the technique, let me explain some important Power Query fundamentals. These concepts will help you understand how the applied steps work, and how they connect to each other. It’ll be important to know this if you ever want to remove these dividers later, or add/move steps to your query.
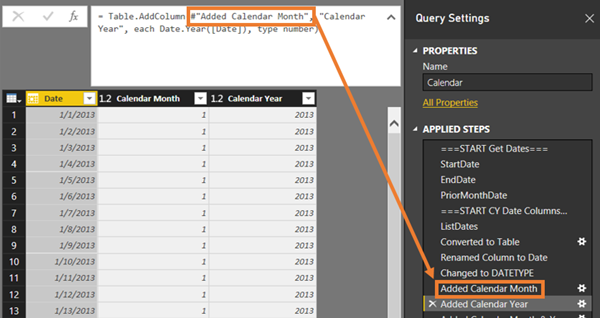
Fun Fact! Whenever you make a new transformation (new step) to your list, by default it references the previous step. In the image below the highlighted step (Added Calendar Year) references the previous step (Added Calendar Month), in the body of the M code. Every step will have a reference similar to the one you see here (make note as we’ll circle back to this later).
Example of how Applied Steps relate to each other:
Interested in Learning How to Do this Kind of Thing?
Our New Online Power Query Course just launched this year. You’ll learn Power Query from the best in the business, two Excel MVPs Ken Puls and Miguel Escobar. We’ve included 7 Hours of Self-Paced Video over 31 Courses, with lots of example files, and a Digital Badge powered by Acclaim. CLICK HERE to claim your spot!

Ready…Set…Code!
Let’s start by walking through how to add these dividers into our Applied Steps. First order of business, you need to know where the Advanced Editor Window is located! It’s found under the View ribbon (same place you turn on the formula bar to see the M Code).
Opening the Advanced Editor window:

Advanced Editor Window – Not as scary as it looks, promise:
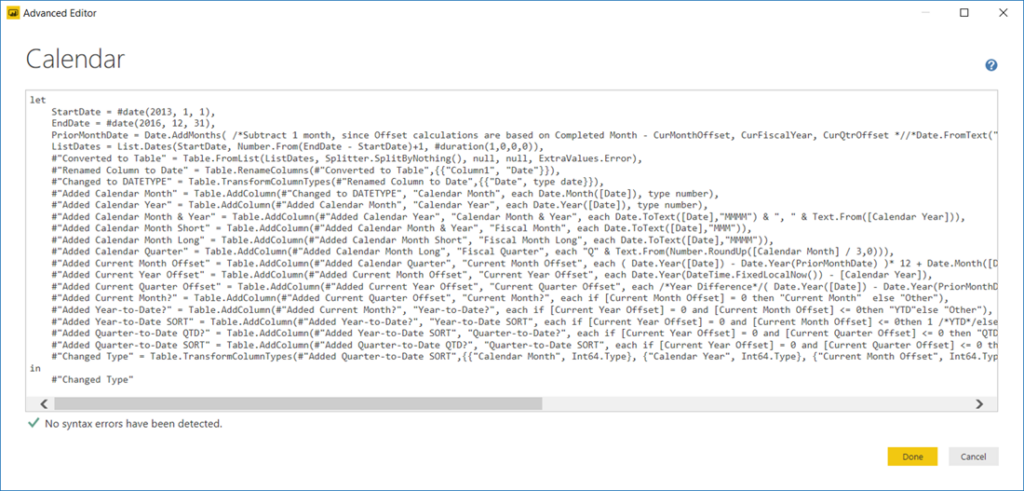
As you gaze into the depths of code within the Advanced Editor window, you can see that each step is nicely given it’s own line. This is the typical layout for any unmodified query in Power Query. It makes it relatively easy to see where one applied step ends, and the next begins. Next I’m going to insert a dividing line into the code, to provide some degrees of separation. I’ll go ahead and insert it right before I start making all my custom columns (E.g. before #”Added Calendar Month”).
Advanced Editor window AFTER adding in the code for my dividing line:
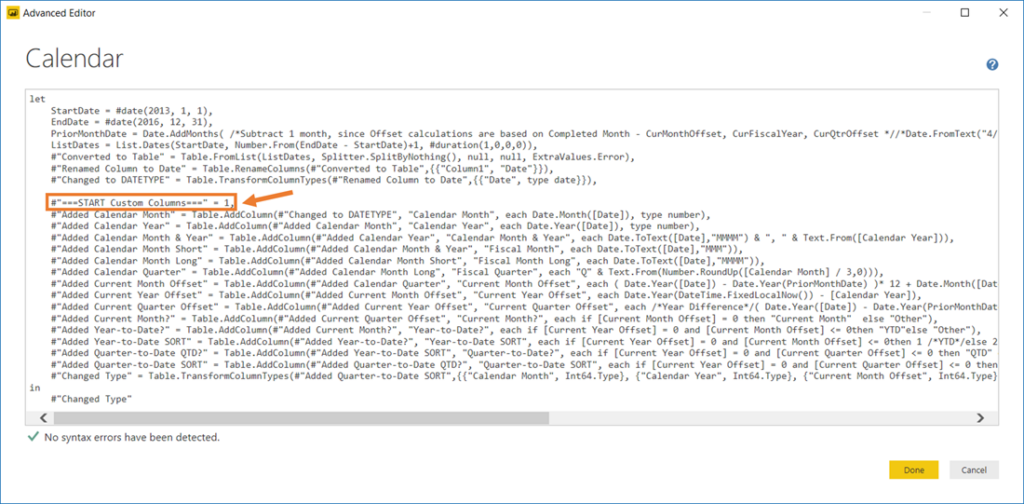
Let’s break down this line of code to understand why I added what I did. Each applied step at is core is essentially two parts. The first part is the applied step name, and the second part is the data output. The name in this instance is #”===START Custom Columns===”. NOTE that you’ll ONLY see the applied step name in the Advanced Editor Window; the Formula Bar only shows the data output.
For any Applied Name, you technically don’t NEED the #”…“ part before and after the name unless it contains spaces. However, as a best practice, I always use them for habit and consistency. And the equals signs in my step name aren’t anything special or required, but rather a way to fill out the row and create a distinctive look compared to other steps.
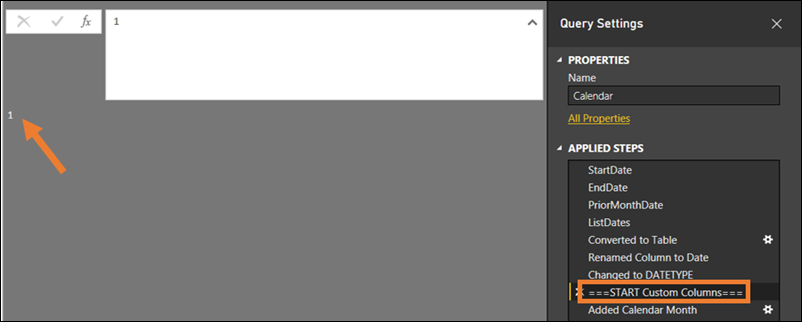
The second part of any applied step is the data output. This is where the transformation goes whenever you create a new applied step. Some data (either a table output or single value) is REQUIRED here for any applied step. Hence the reason I’ve created “dummy” data in mine as a single numerical value. It doesn’t do anything other than make sure this artificial step works.
Applied Step results after adding my dividing line (Note the 1 value output when selected):
The Applied Step Added Calendar Month still references the SAME STEP before the addition of the divider:
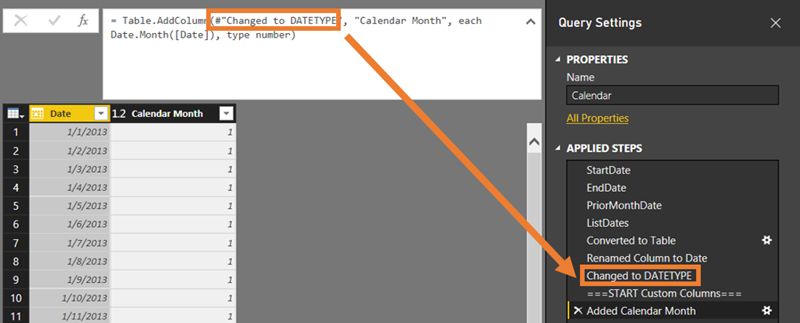
The divider step is essentially hidden between the other two, there to provide visual separation and nothing else. I’m a HUGE FAN of this technique because it’s a great way to slowly introduce users to the logic and components that make up each applied step. Now if you want to delete a divider step, you can easily just select the delete (X) icon next to the step to get rid of it, just like any other step.
A Brief Word of Caution
Power Query can get finicky if you start trying to add and/or move steps around after creating your divider steps. If you do this, there are a few ways that a new or existing step could accidentally get referenced. If that happens it will temporarily break the query unless you redirect the step back to the correct one.
Error message after moving a step in front of my custom step:
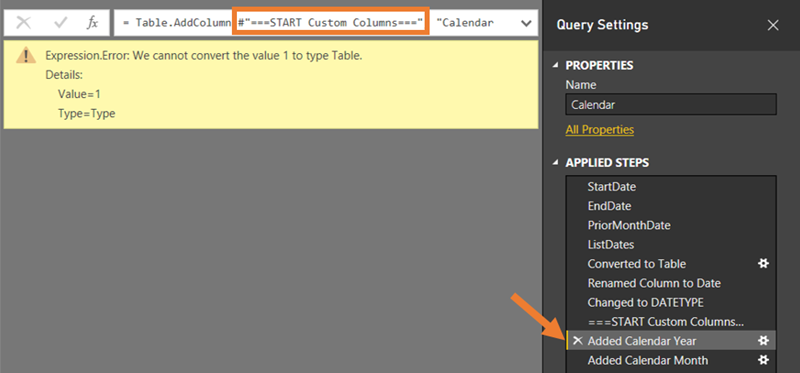
Moving the Added Calendar Year applied step in front of my custom step caused it to break…but why? Well, whenever a step is reordered, it will always default to using the previous step in the list. So by reordering this step right after my custom one, it assumes it should reference that as it’s data source…which we DO NOT WANT.
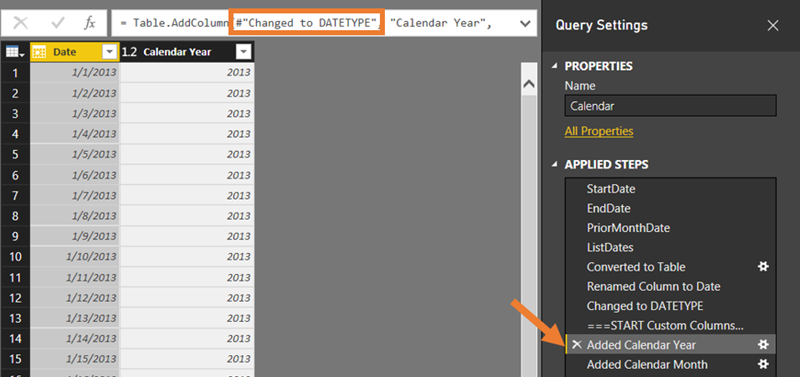
Circling back to the M code basics you learned earlier, you can FIX THIS by reassigning that source back to the correct step. You’ll want to change the step name in the Formula Bar to point it back to the Changed to DATETYPE applied step. Once you’ve done that the divider step will go back to ninja mode, hidden amongst the other steps.
Query working correctly after updating the step (data) source for Added Calendar Year to Changed to DATETYPE:
Improved Method (New Hotness!)
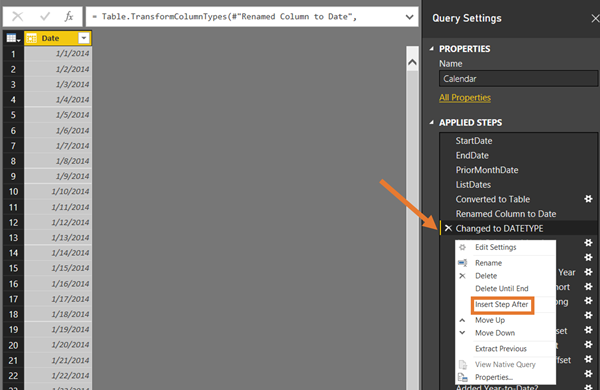
Alright folks, now let me show you how to do this WITHOUT the Advanced Editor! Again, as Milan Grahovac graciously mentioned in the comments. There’s an easy way to add these note line notes without touching M code. Same concept, but without the issue of accidentally breaking a step if you delete the custom line of code. That same dropdown menu we go to when renaming a step, well there’s another option in there we can use. There’s a button called Insert Step After that essentially references the previous step, but without doing any actual transformations. What this means is no performance hit, and a beautifully integrated step you can rename as a divider!
Same process as renaming. Right click, and select Insert Step After:
Boom, new custom step:
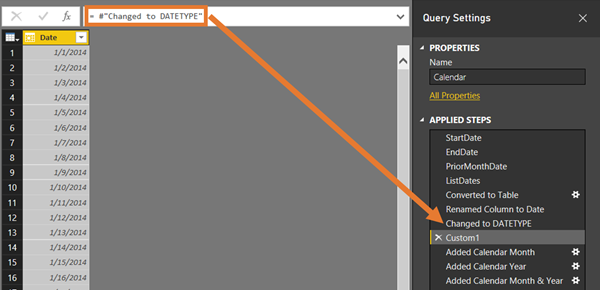
The beauty of this is twofold: no Advanced Editor needed, and it’s less prone to break. You can observe how this custom step is simply referencing the previous step, without any transformation applied. So this won’t slow down your refresh AT ALL. All this does it provide us a line in our Applied Steps to create a line or section. Just simply rename it like you would any other step. Now the old method is still a great gateway drug to the world of M coding. Next thing you know you’ll be inserting functions, folding queries, and appending tables oh my! If this managed to wet your appetite for the possibilities with M, then mission accomplished for me. Stay tuned for the next post in this series! Until then folks!
Get in touch with a P3 team member